Table of Contents

Copy Files Pro banner

Copy Files Pro: Installation & User Guide

monday.com Marketplace Link:  https://monday.com/marketplace/listing/10000764/copy-files-pro

Installation Guide

Steps to Install

  1. You can install the app using the above link or open monday.com Marketplace, search for Copy Files Pro > Click the Copy Files Pro app card > Click Install.

Now Copy Files Pro is Installed in your System.

You can verify this by clicking on the icon at the top right corner > clicking Administration > Apps. You will see that Copy Files Pro has been installed.

Using the Copy Files Pro Integration Recipes

  1. Open a Board of your choice.
  2. Click on the Integrate button at the top of the board.

  1. Search for Copy Files Pro in the search bar > Use any recipes by clicking on the Use template button.
Copy Files Pro All Recipes
  1. We are using  monday.com OAuth so you will be redirected to the monday.com authorization page. This is a one-time process for every user who wants to create a recipe.

Once the authorization is completed, you will be redirected back to the integration recipe.

The automation has been added to your board ✅.

Cheers! Your app is ready to use.

For any assistance with this process, send an email to “apps@cloudvandana.com” and we will help!

User Guide Copy Files Pro

With the Copy Files Pro app, you can

  1. Copy, Sync, or Move files between file columns or items in monday.com, whether within the same board or across different boards.
  2. Rename a file and perform the above-mentioned operations.
  3. Copy or Sync files from Updates to the Files column.

Now, open a board of your choice to use the Copy Files Pro app.

Using Copy Files Pro App Actions

1. Copy Files between the same item’s file columns

Requirements to use this action,

  1. From Column(file column type only), which shows from which column to copy files.
  2. To Column(files column type only), which shows to which column the files needed to be copied.

Now, at the top, you will find the Automate button Click on it > click the Add Custom Automation button.

Select a trigger of your choice > In the “Then do this” option, search for Copy Files Pro > Click on the action that comes with the Copy Files Pro app name > Select action “Copy files(s) from one column to another” > Fill all the input fields > Click on Create automation.

CFP Actions Copy Files Pro Action

Once you click on the Create automation button an automation with the Copy Files Pro app action will be added to the board, and is now ready for use.

Action in action,

Once you change the Status column to Done, the automation starts running.

After a few seconds(depending on file size and number of files), the file is copied to the selected file column.

NOTE: You can add an action with any trigger of your choice, like button click, column change, date arrived, etc.

2. Rename the file and save it to the same item’s file columns

Requirements to use this action,

  1. From Column(files column type only) which shows from which column to copy files.
  2. To Column(file column type only), which shows to which column the files needed to be copied.
  3. A column whose value will be used to name the file.
Two actions cover this use case: Action numbers 2 and 3. CFP Actions For now, we have selected action number 2, which takes the file name as the input text field while creating the automation. Action to rename file and save it to same item's files column

Once you click on the Create automation button an automation with the Copy Files Pro app action will be added to the board, and is now ready for use.

NOTE: You can also specify a column whose value will be used to name the file by simply selecting the action that uses “Column Value”(Action number 3) for the file name.

3. Copy files from Updates to the file columns

Requirements to use this action,

  1. Files Column to which file will be copied.
Select the action “Copy Item Updates files to Files column”. CFP Actions CFP Updates Files Action

Once you click on the Create automation button, an automation with the Copy Files Pro app action will be added to the board, and is now ready for use.

Now, every time an update is created manually or from email, the update files will be copied to the selected Files column. We suggest using “Sync” here instead of Copy. Sync will copy the file only once, so if a file is already copied, then it will not be copied again; only new files will be copied.

Using Copy Files Pro App Recipes

1. Copy Files between the same item’s file columns

At the top, you will find the Integrate button. Click on it > Search for Copy Files Pro > Click the Use Template button of the first recipe.

Requirements to use this recipe,

  1. A Column(of any type) that will act as a trigger.
  2. From Column(files column type only) which shows from which column to copy files.
  3. To Column(file column type only), which shows to which column the files need to be copied.
NOTE: You can copy, sync, or move files. The difference between them is that
  1. Copy: It always copies files from one column to another.
  2. Sync: It only copies files that are not already copied. For instance, if there are 2 files on a Files column named “Source Column” and you run the automation then the 2 files will be copied. Now you uploaded another file to the same Files column(Source Column) and ran the automation, then only the new file will be copied.
  3. Move: It moves files from one Files column to another.
Move Caution Same Board Recipe CFP Creating Automation

Once you click on the Create automation button the recipe(automation) will be added to the board, and is now ready for use. You can confirm it by clicking on the Automate button at the right of the Integrate button(using which you have added the recipe), here you will see all the automation (recipes) currently present for the respective board.

CFP Automation Created

Recipe in action,

Once you change the column, the automation starts running.

After a few seconds(depending on file size and number of files), the file is copied to the selected file column.

NOTE: You can copy any number of files you want, currently, there is no limit on the number and size of files.

2. Copy files from one item to another on the same board

You can copy files between items on the same board.

There are 4 recipes to do this. The only difference is the type of trigger, such as on button click, column change, when status changes to something, and when status changes from something to something.

Requirements to use this recipe,

  1. A Button Column that will act as a trigger.
  2. Files column from which the files are to be copied.
  3. Connect Boards Column, this column should be connected to the same board’s items otherwise, the files will not be copied. This column connects a board’s items to another board’s items. And here we have made the connection with the same board’s items. You can read about the connect boards column here.
  4. If you want to copy files to other items same files column then skip this step,
  5. Another files column to which the files will be copied.

You can use any recipe from recipe number 2 to 5. Currently, I am using recipe 2 which will be triggered by Button click.

Item to Item Recipe CFP creating recipe to copy files on button click

Now it’s time to connect items using the selected connect boards column.

In my case, I have connected the “Design Logos” item of Group  Active Projects with the same board’s item “Video Production”.

As I clicked on the button, the “Design Logos” item’s files were copied to the “Video Production” item files column.

3. Copy files from one board’s item to another board’s item

You can copy files between items on different boards.

There are 4 recipes to do this. The only difference is the type of trigger, such as on button click, column change, when status changes to something, and when status changes from something to something.

Requirements to use this recipe,

  1. A Status Column that will act as a trigger.
  2. Files column in the current board from which the files are to be copied.
  3. Another Board, which acts as a Target board, to which file column the file will be copied.
  4. Connect Boards Column in the current board, this column should be connected to another board’s items. This column makes a connection between the current board’s items to another board’s items. You can read about the connect boards column here.
  5. Files column in the other board to which the files will be copied.

You can use any recipe from recipe number 2 to 5. Currently, I am using recipe 5 which will be triggered when the selected Status column’s status is Done.

Different Boards Recipe CFP automation to copy files when status changes to done recipe Now it’s time to connect items using the selected connect boards column.

In my case, I have connected the “Create a website” item of the current board(Projects In Progress) with the “SpaceX” item of another board(Completed Projects).

Current board,

Other board,

Since I changed the “Create a website” item’s Project Status column to Done, the files from the current board’s “Website Screenshots”(column-type files) will be copied to the other board’s “Target Column”(column-type files).

4. Rename file and save it to same item’s files column

Requirements to use this recipe,

  1. A Status Column that will act as a trigger.
  2. From Column(files column type only) which shows from which column to copy files.
  3. To Column(files column type only) which shows to which column the files needed to be copied.
  4. A column whose value will be used to name the file.
NOTE: For now, columns like Connect boards, Monday doc, and Dependent on are not supported for the file name column. If you select these columns the automation will not work! Rename file and save to same item's files column Rename file and save it to same item's file column

Once you click on the Create automation button the recipe(automation) will be added to the board, and is now ready for use. 

Recipe in action,

Once you change the selected column’s status from “Working on it” to “Done”, the automation starts running.

Rename file automation running

After a few seconds(depending on file size and number of files), the file is renamed and copied to the selected file column.

Rename file automation completed

NOTE: You can also specify a file name while creating the automation recipe. This will apply the same name to all the files copied using this recipe.

5. Rename file and save it to another board’s item

It’s also possible to rename files and save them to items on different boards.

Requirements to use this recipe,

  1. A Button Column that will act as a trigger.
  2. Files column in the current board from which the files are to be copied.
  3. Connect Boards Column in the current board, this column should be connected to another board’s items. This column makes a connection between the current board’s items to another board’s items. You can read about the connect boards column here.
  4. Another board acts as the target board where the file will be copied.
  5. Files column in the other board to which the files will be synced.
Rename file and save it to another board(input text) Rename File and Save it to Another Board Recipe Creation Now it’s time to connect items using the selected connect boards column.

In my case, I have connected the “Campaign Management” item of the current board(Projects In Progress) with the “Netflix” item of another board(Completed Projects).

Current board,

Rename File and Save to Another Board Source Board

Other board,

Rename File and Save to Another Board Another Board

Since I clicked the “Campaign Management” item’s Button, the automation started running and files from the current board’s “Website Screenshots”(column-type files) will be renamed to “Files From Projects In Progress Board” and synced to the other board’s “Target Column”(column-type files).

Rename File and Save to Another Board Automation Completed NOTE: You can also choose a column to use for naming the file by simply using the recipe which uses “Column Value” for filename.

6. Copy files from another board’s item into the current item

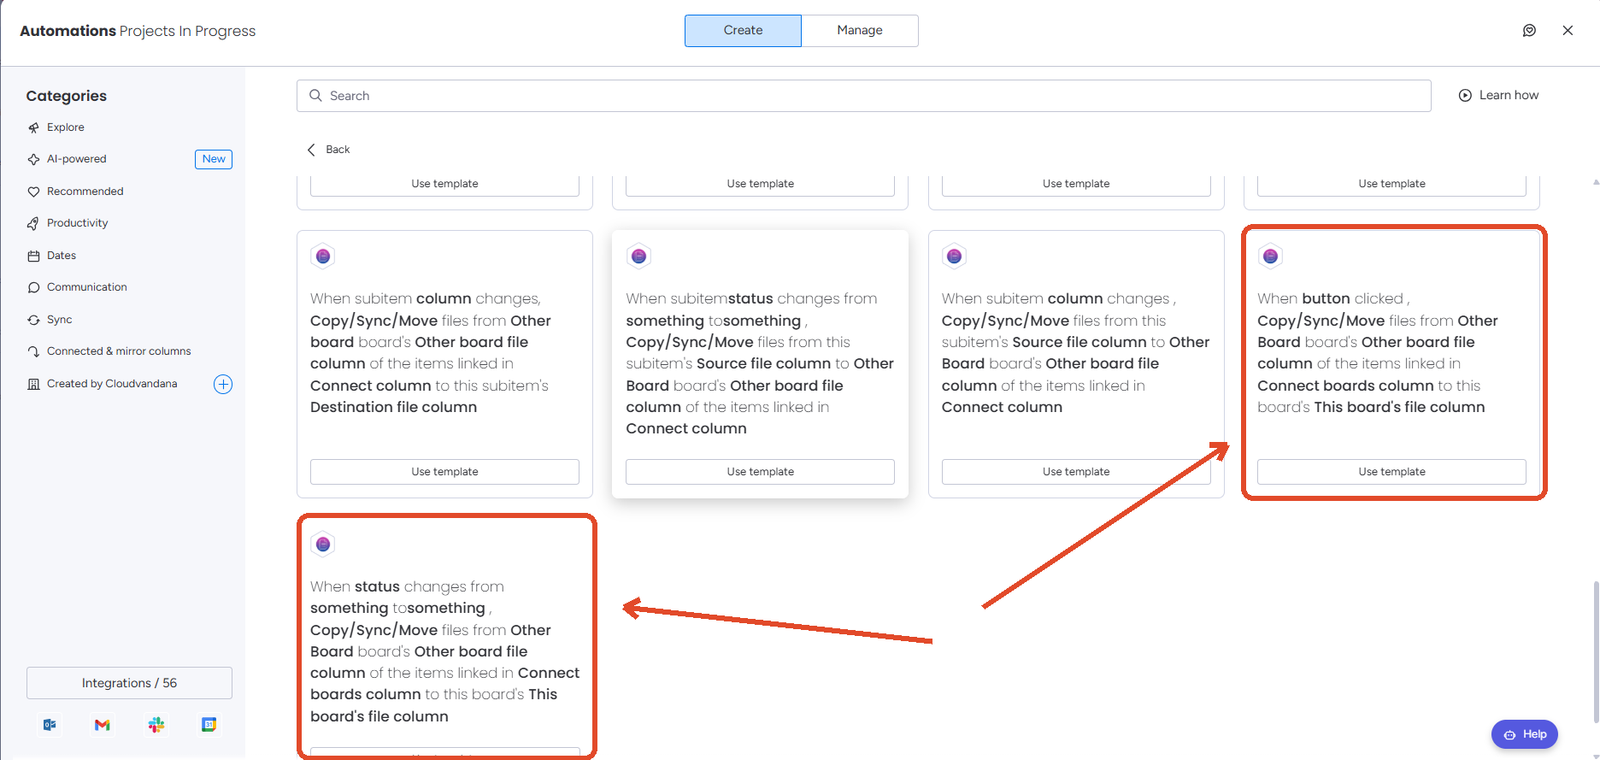
You can also copy files in the other direction, from items on another board into the item on your current board.

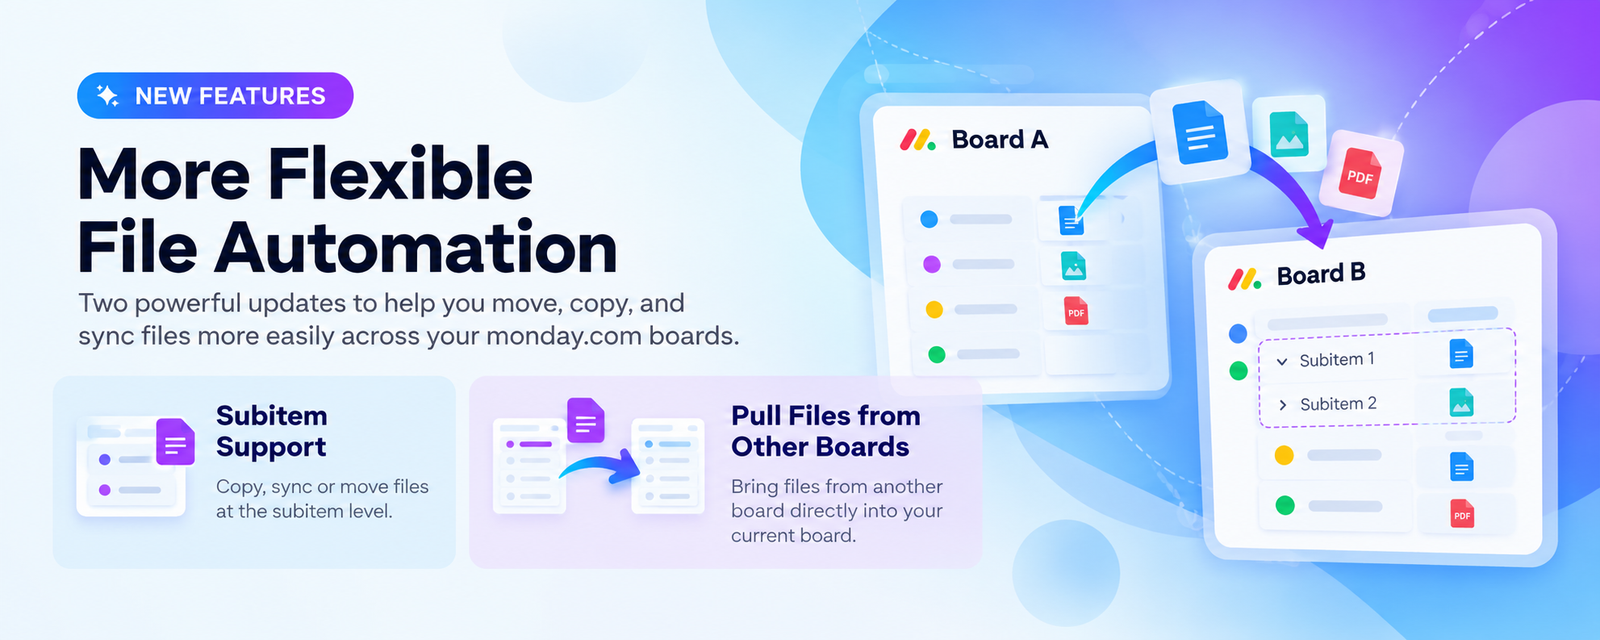
There are 2 recipes to do this. The only difference is the type of trigger, when a status changes to something and on button click.

Requirements to use this recipe,

  1. A Status Column that will act as a trigger.
  2. Another Board, which acts as the source board, from which the files will be copied.
  3. Files column in the other board from which the files are to be copied.
  4. Connect Boards Column in the current board, this column should be connected to the same board you selected above. This column makes a connection between the current board’s items to another board’s items. You can read about the connect boards column here.
  5. Files column in the current board to which the files will be copied.
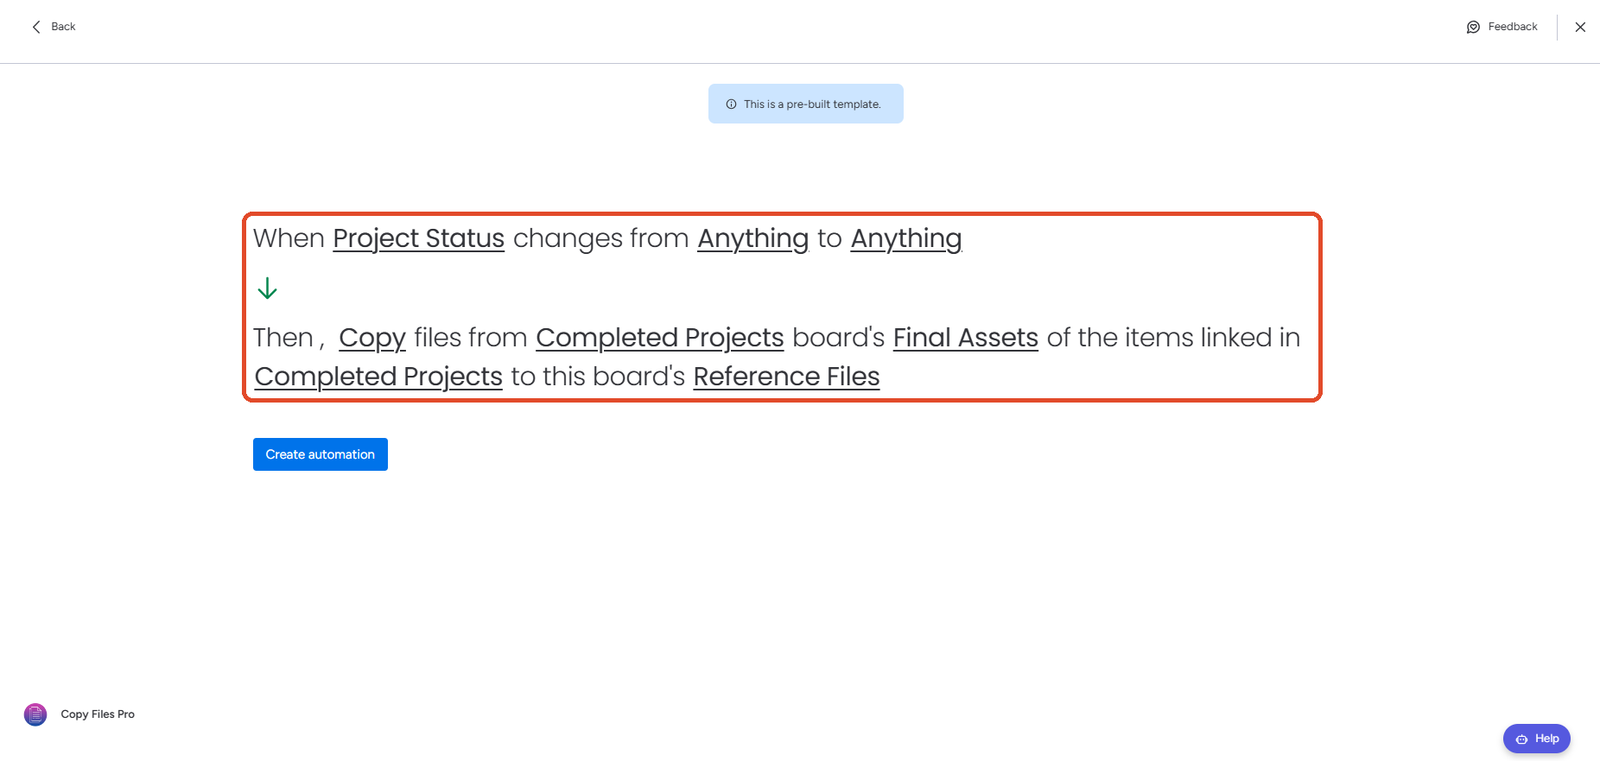
both pull recipe cards in the Integrate panel the recipe sentence fully filled in

Now it’s time to connect items using the selected connect boards column.

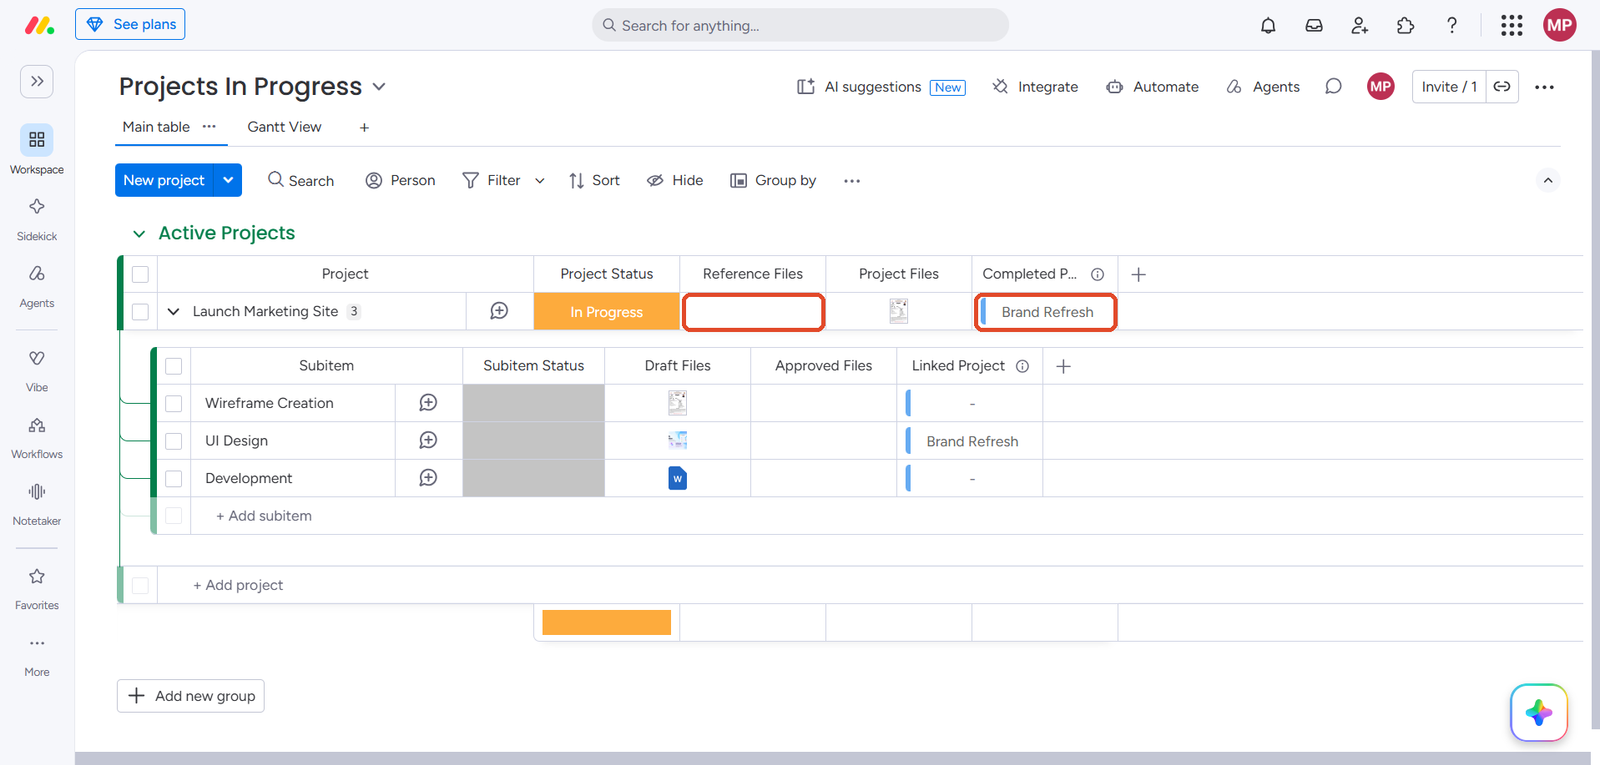
In my case, I have connected the “Launch Marketing Site” item of the current board(Projects In Progress) with the “Brand Refresh” item of another board(Completed Projects).

Current board,

Projects In Progress, connect column filled, Reference Files empty

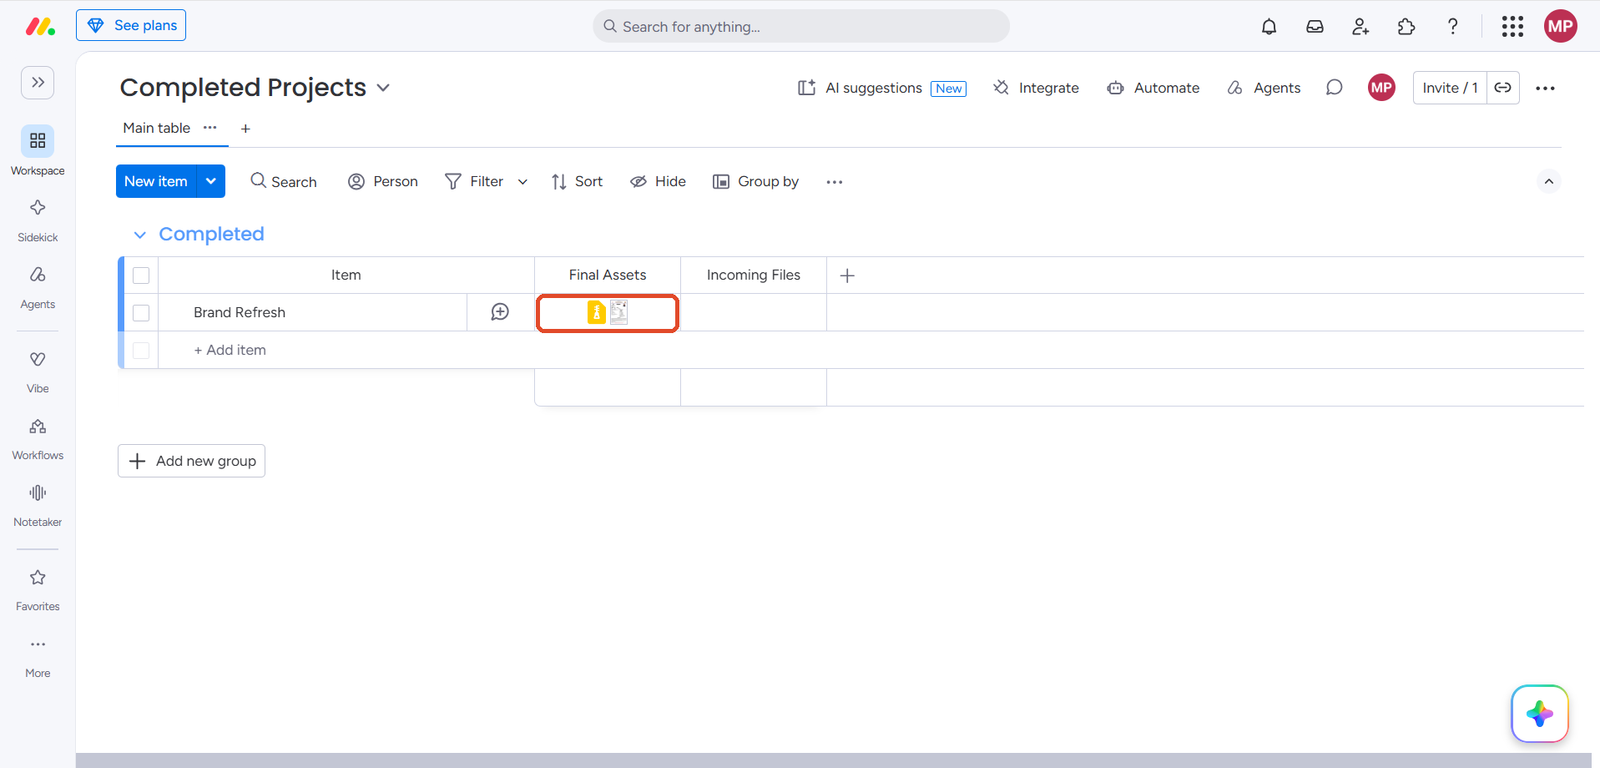
Other board,

Completed Projects, Brand Refresh with both files in Final Assets

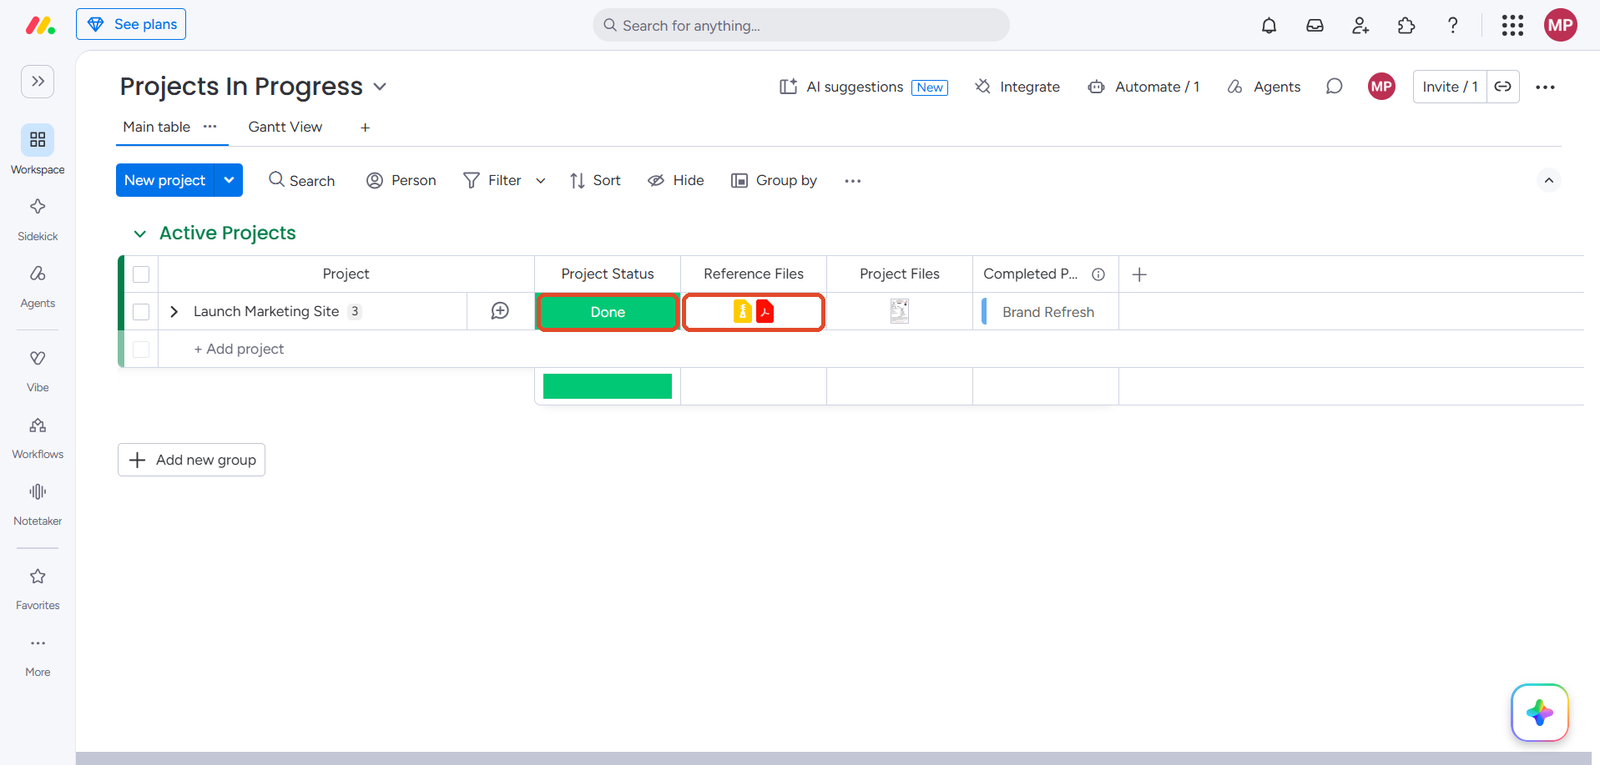
Since I changed the “Launch Marketing Site” item’s Project Status column to Done, the files from the other board’s “Final Assets”(column-type files) were copied into the current board’s “Reference Files”(column-type files).
Projects In Progress after the run, files in Reference Files

NOTE: The Connect Boards column you select must be connected to the same board you selected as the source board. If it is connected to a different board, the automation will complete successfully but no files will be copied.

NOTE: If the current item is connected to several items on the other board, the files from all of them are collected and copied together. A file that is connected from more than one item is only copied once.

Using Copy Files Pro App Subitem Recipes

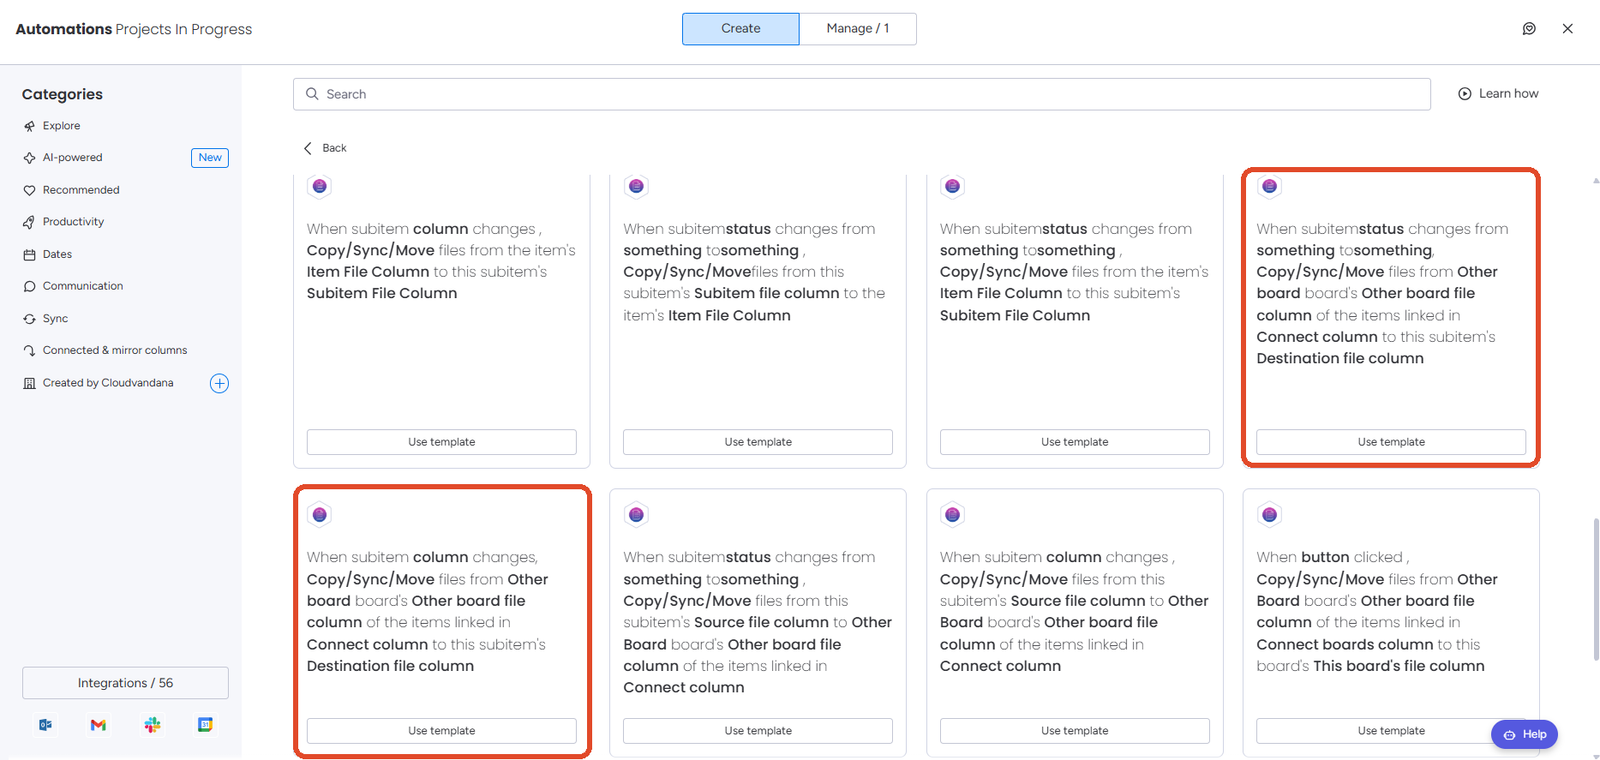
Copy Files Pro also works with subitems. You can copy files between a subitem’s own file columns, move files between a subitem and its parent item, and copy files between a subitem and another board.

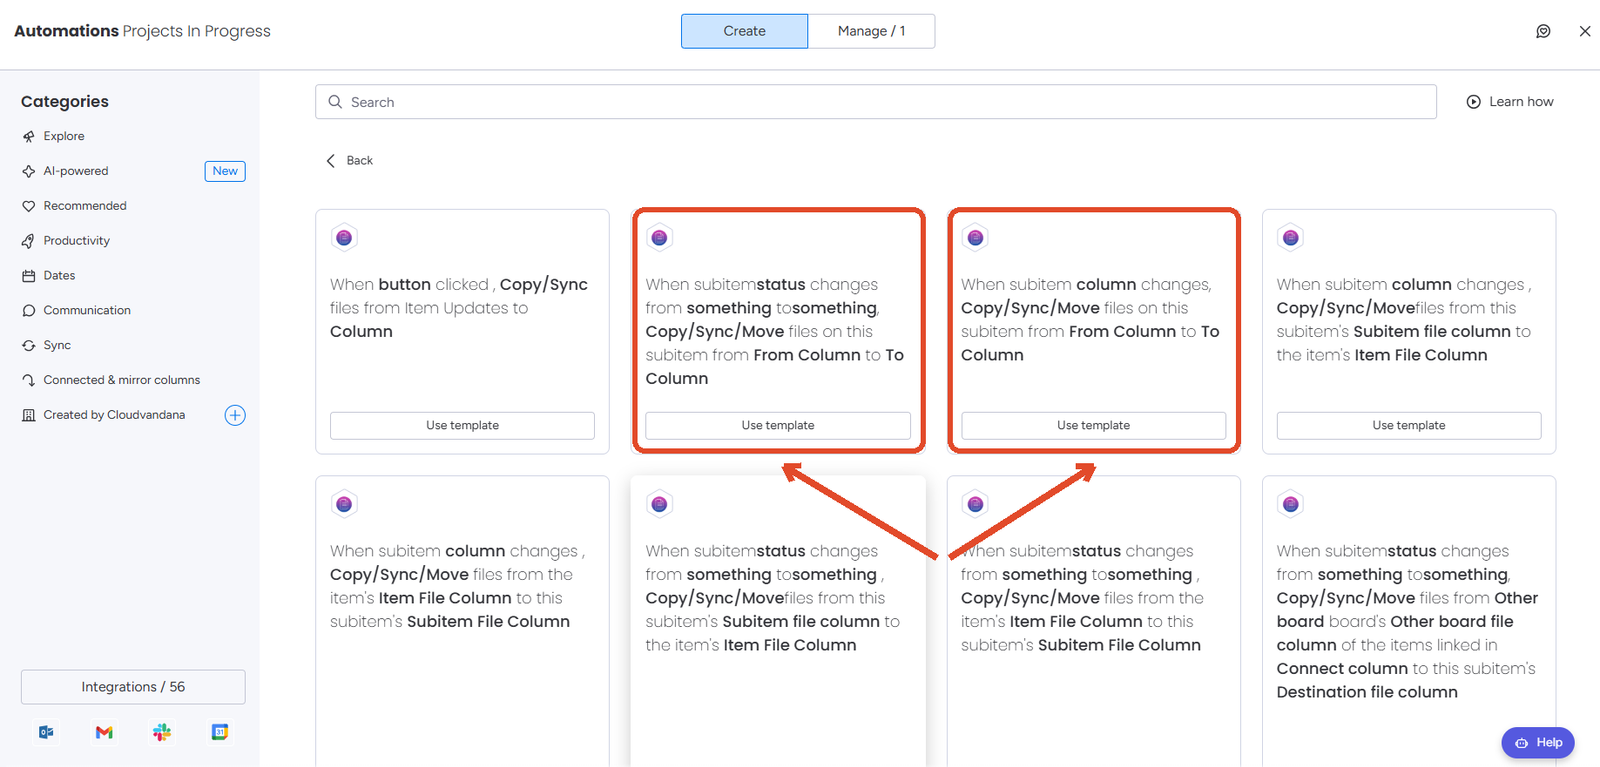
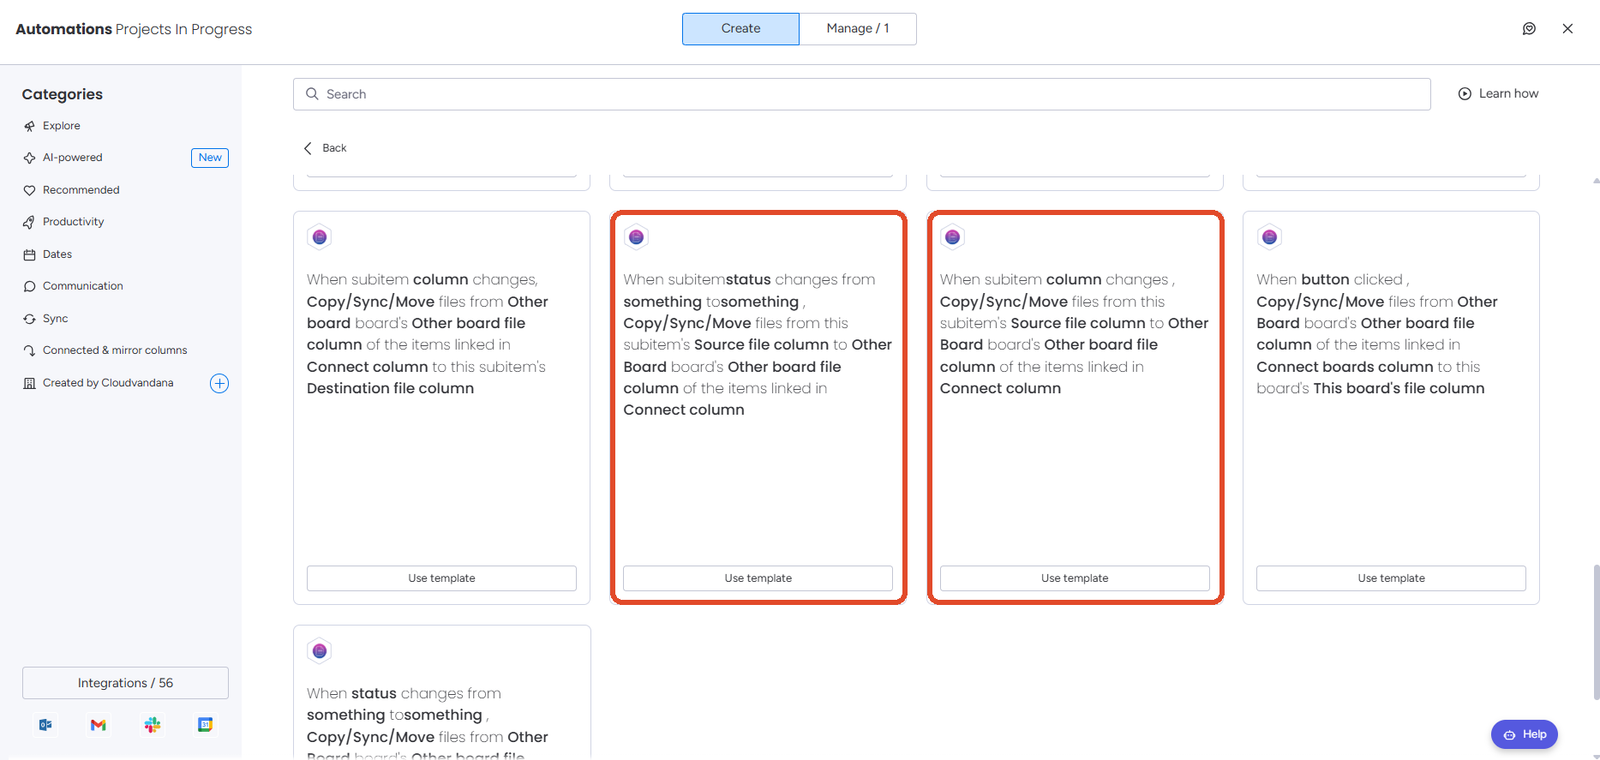
Every subitem recipe comes in 2 versions. The only difference is the type of trigger, when a subitem status changes to something and when a subitem column changes.

NOTE: Subitem recipes must be added using the Integrate button. monday.com does not currently support adding third-party app actions to subitem triggers through the Add Custom Automation route, so these recipes are available as templates only.

NOTE: Subitems live on their own board, separate from the board you see. Every column you select in a subitem recipe must be a column on that subitems board, not a column on the parent board. The dropdowns only offer you valid columns, so you cannot pick the wrong one by mistake.

1. Copy files between a subitem’s file columns

You can copy files from one file column to another on the same subitem.

Requirements to use this recipe,

  1. A Subitem Status Column that will act as a trigger.
  2. From Column(files column type only) on the subitems board, which shows from which column to copy files.
  3. To Column(files column type only) on the subitems board, which shows to which column the files need to be copied.
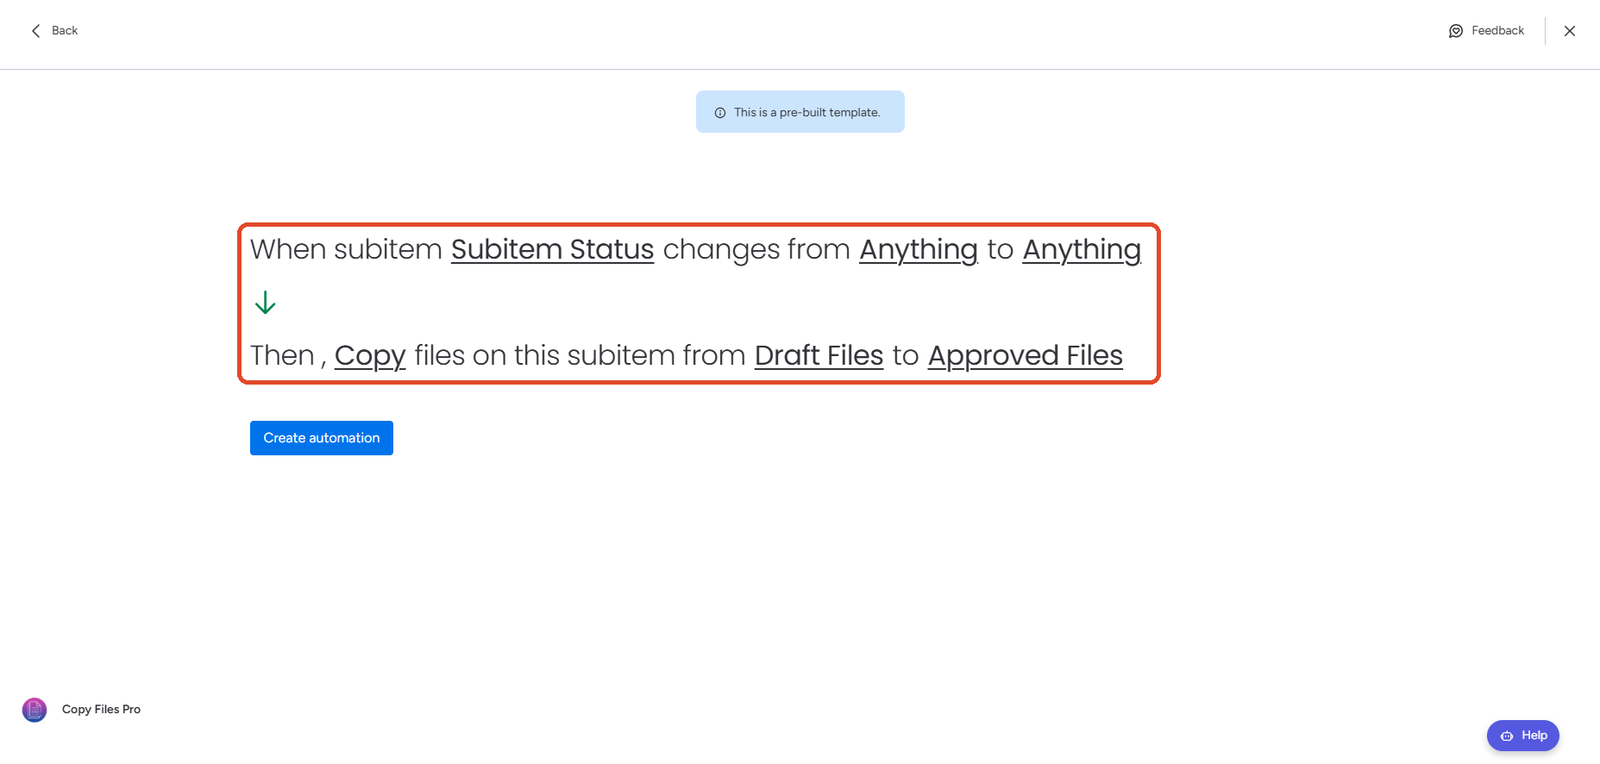
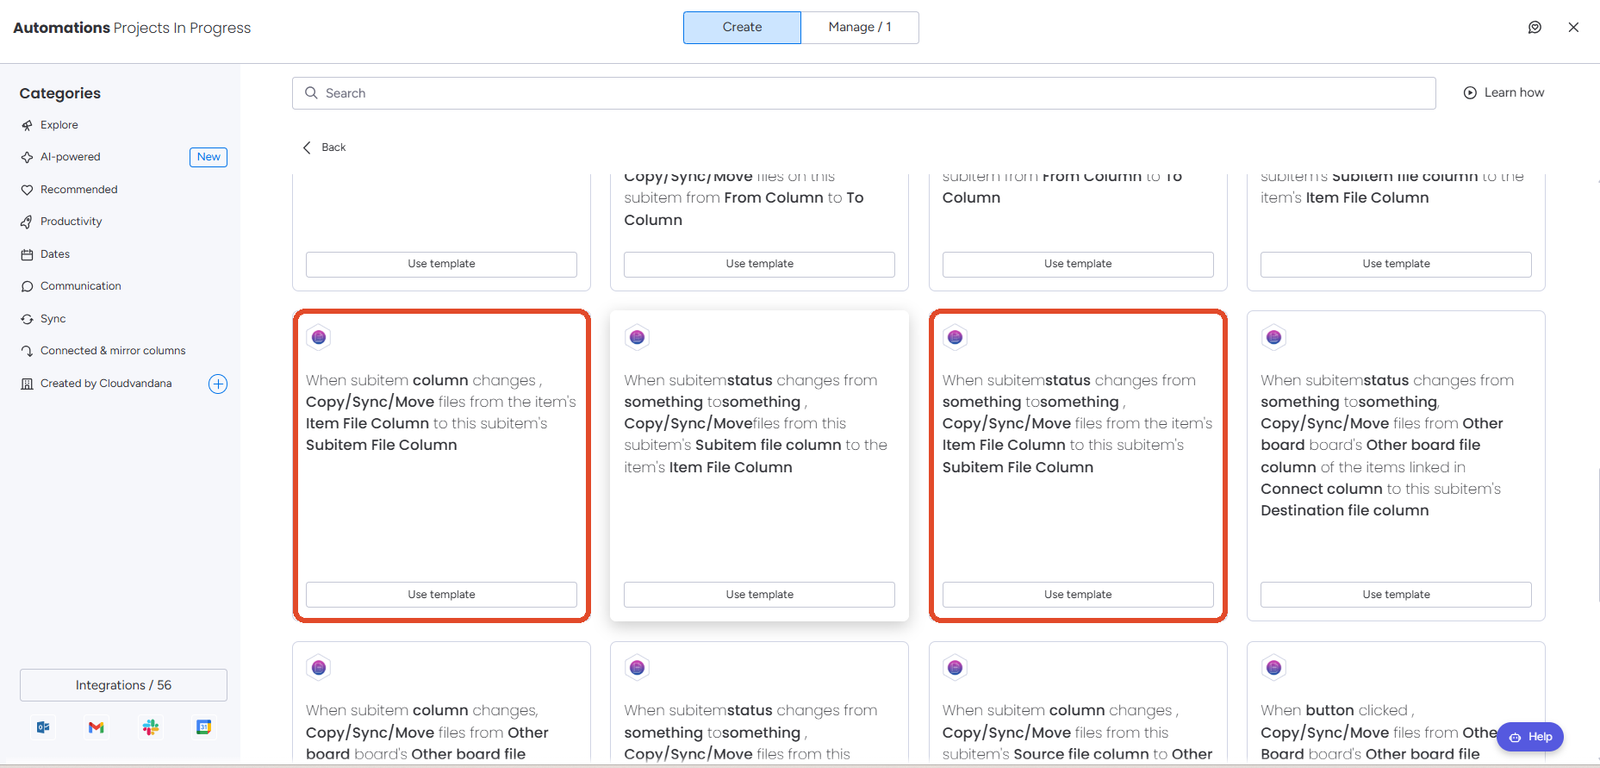
the two recipe cards in the Integrate panel the recipe sentence fully filled in

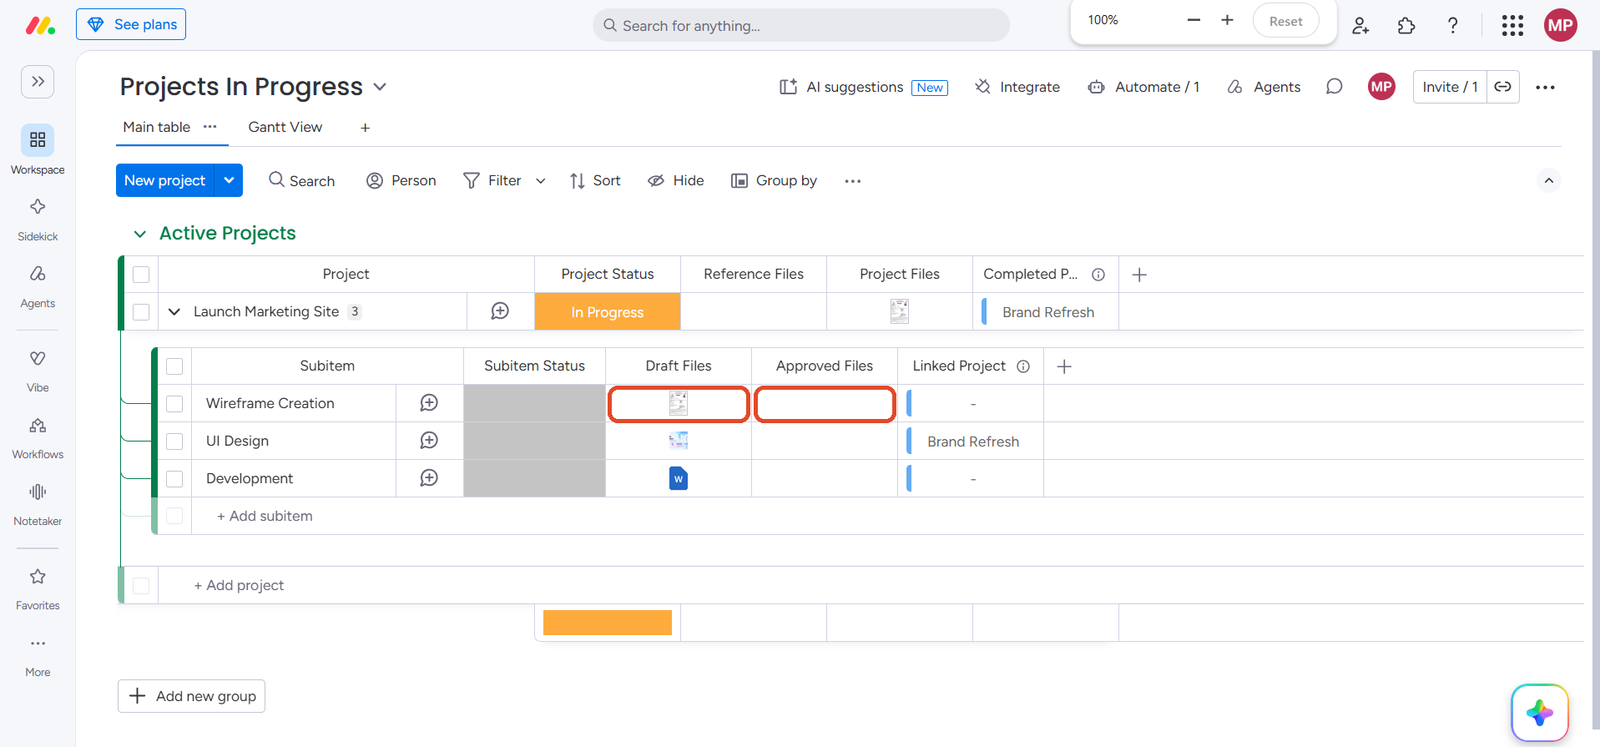
In my case, the subitem “Wireframe Creation” of the item “Launch Marketing Site” has a file in its “Draft Files” column.

subitems expanded, Wireframe Creation has a file in Draft Files, Approved Files empty

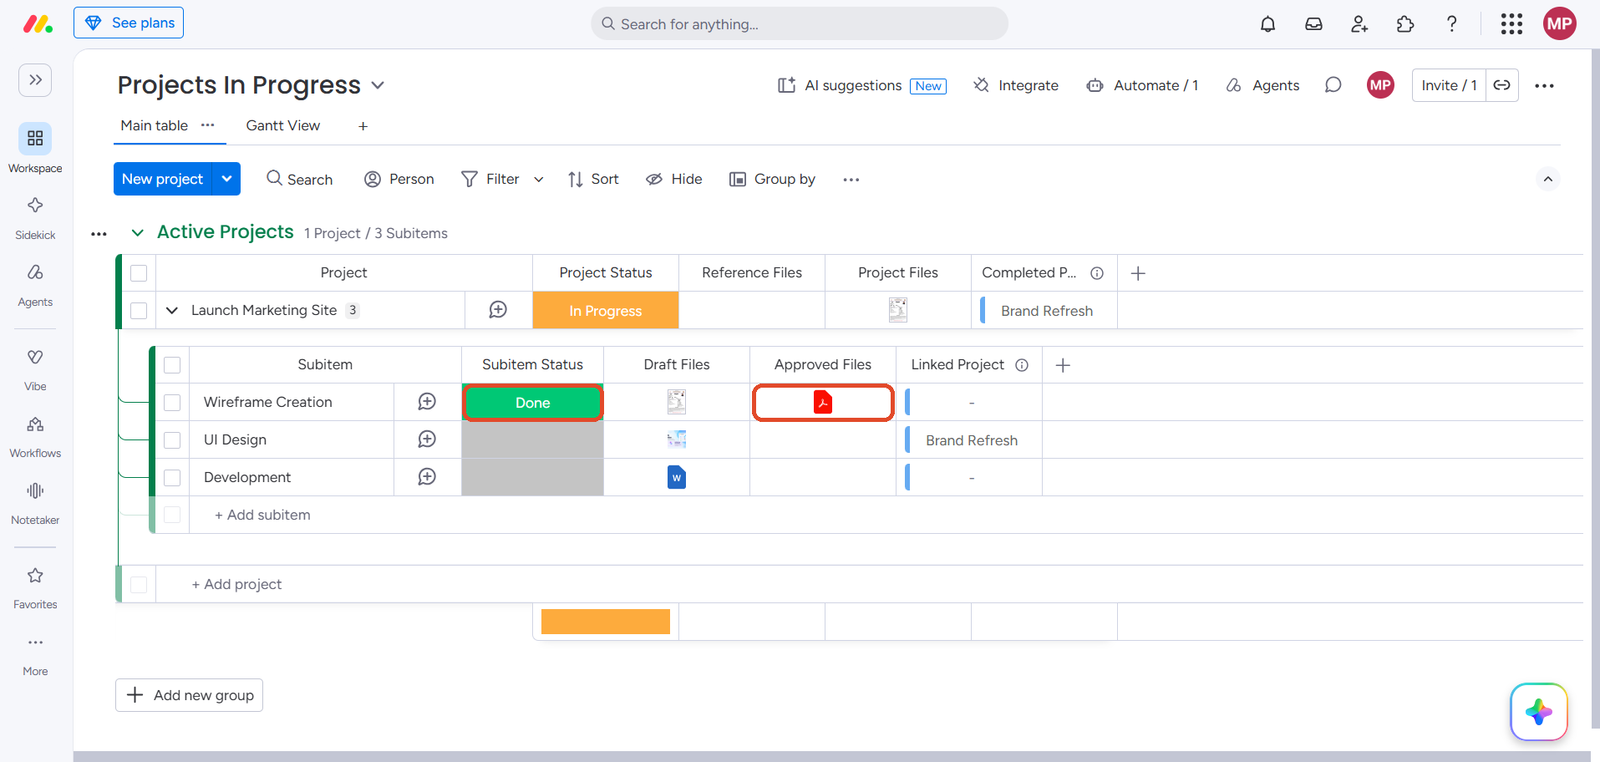
Once I changed the subitem’s Subitem Status column to Done, the file was copied to the “Approved Files” column of the same subitem.

subitems expanded, the file now in both Draft Files and Approved Files

NOTE: Only the subitem whose status changed is affected. The other subitems of the same item are left alone.

2. Copy files from subitems into their parent item

You can collect the files from a parent item’s subitems into a file column on the item itself.

Requirements to use this recipe,

  1. A Subitem Status Column that will act as a trigger.
  2. Subitem File Column(files column type only) on the subitems board from which the files are to be copied.
  3. Item File Column(files column type only) on the parent board to which the files will be copied.
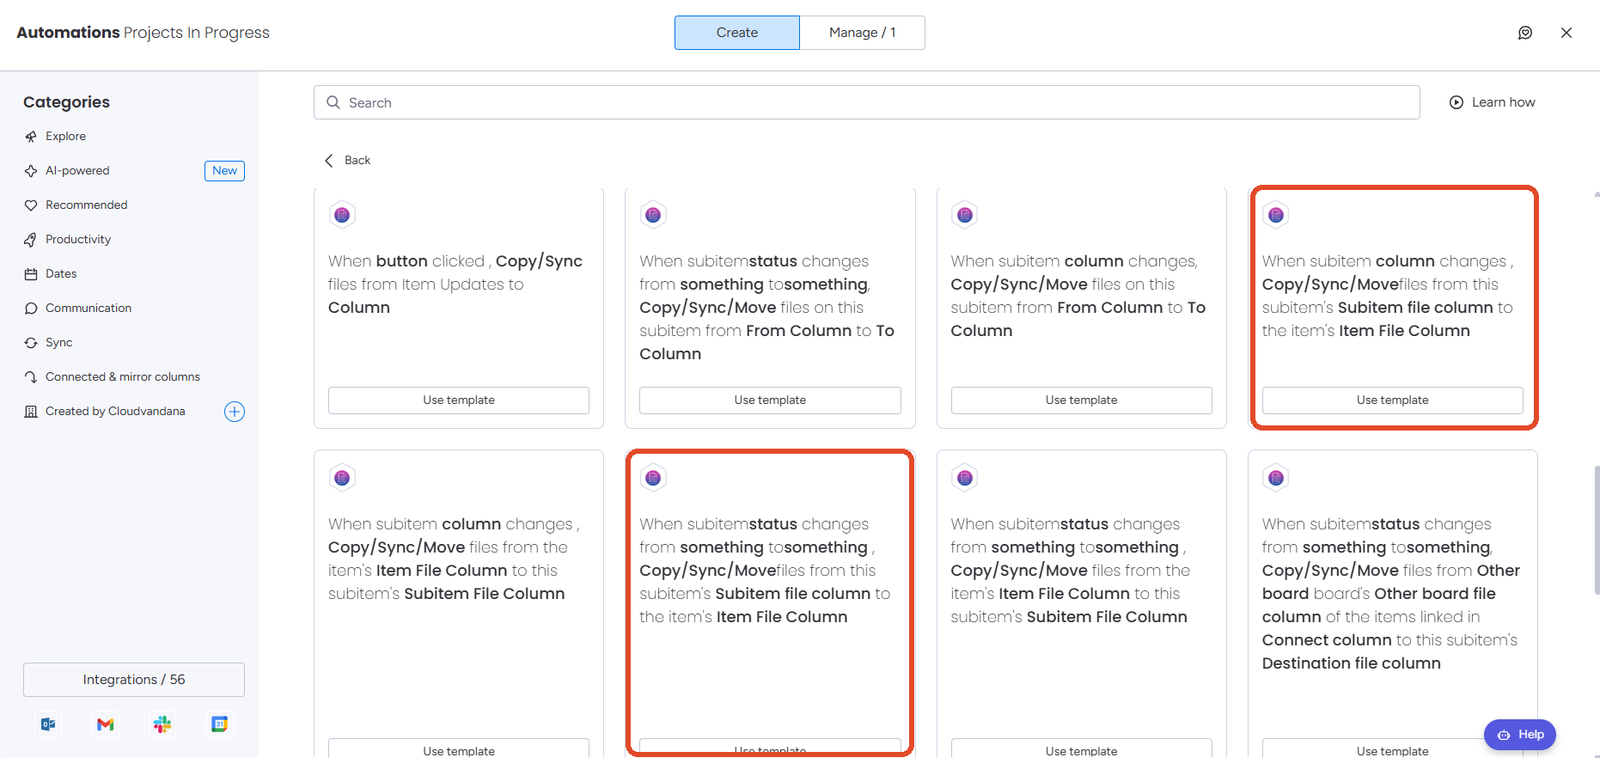
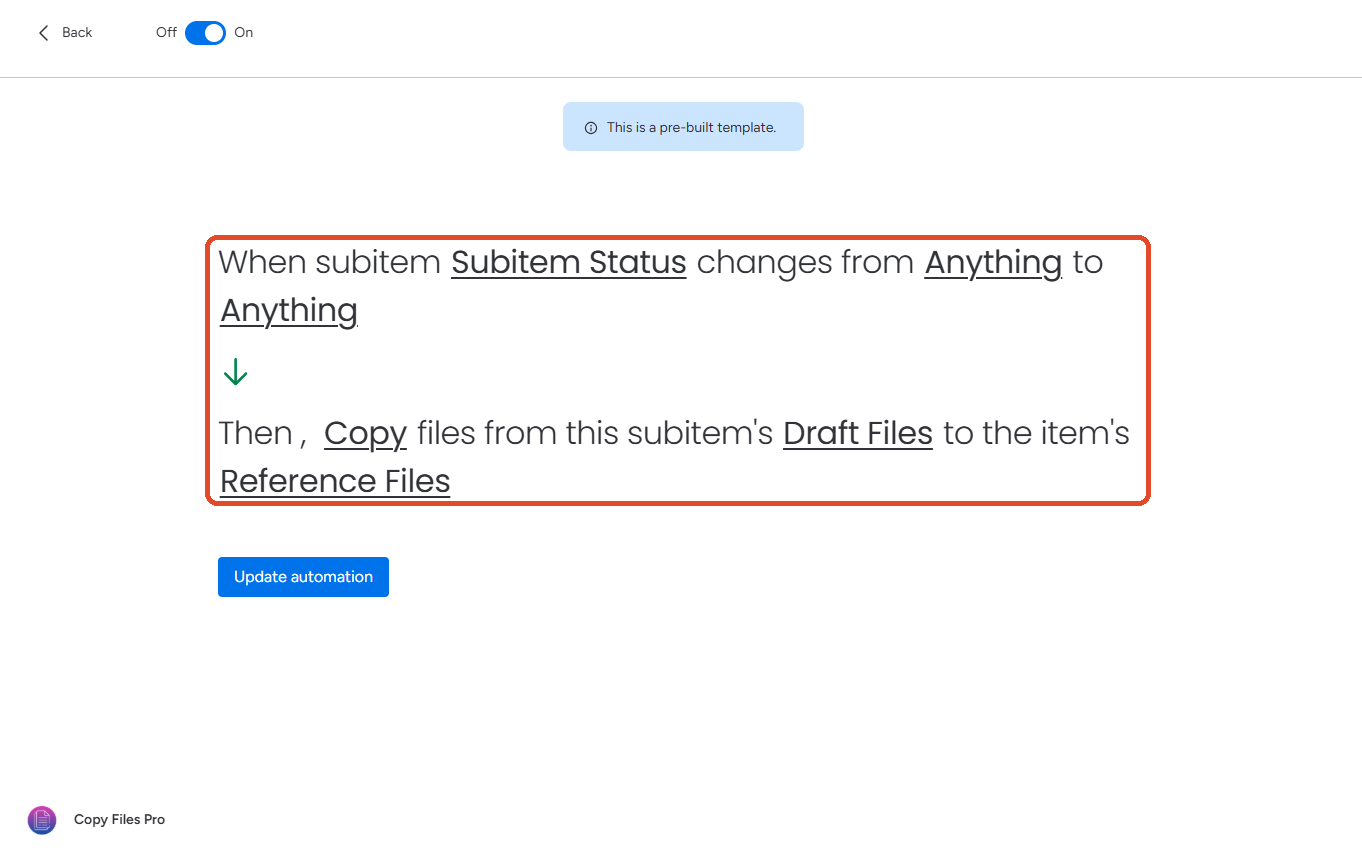
the two recipe cards in the Integrate panel the recipe sentence fully filled in

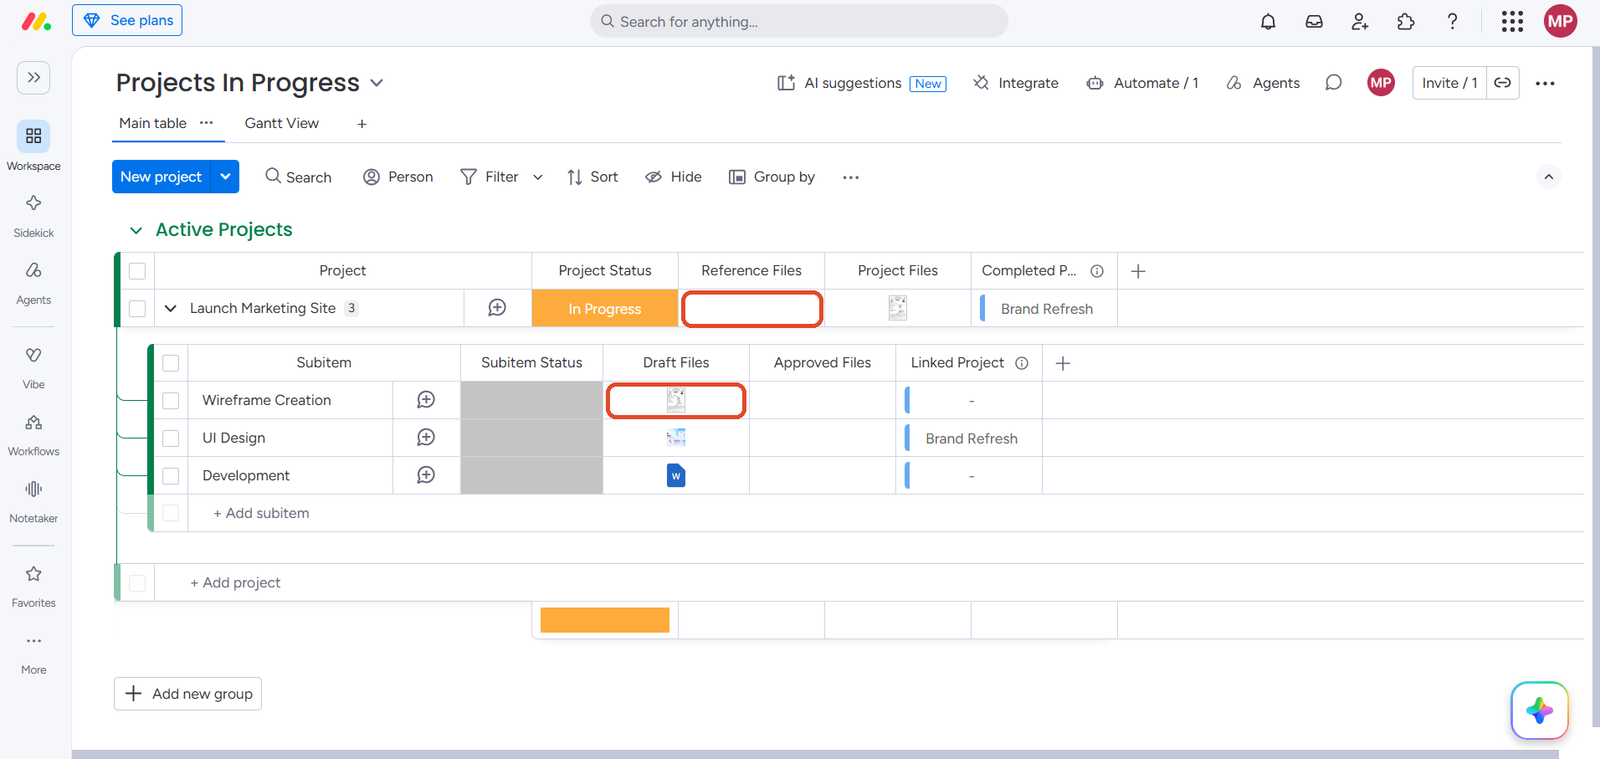
In my case, the subitem “Wireframe Creation” of the item “Launch Marketing Site” has a file in its “Draft Files” column, and the item’s “Reference Files” column is empty.

subitems expanded, Wireframe Creation has a file in Draft Files, item’s Reference Files empty

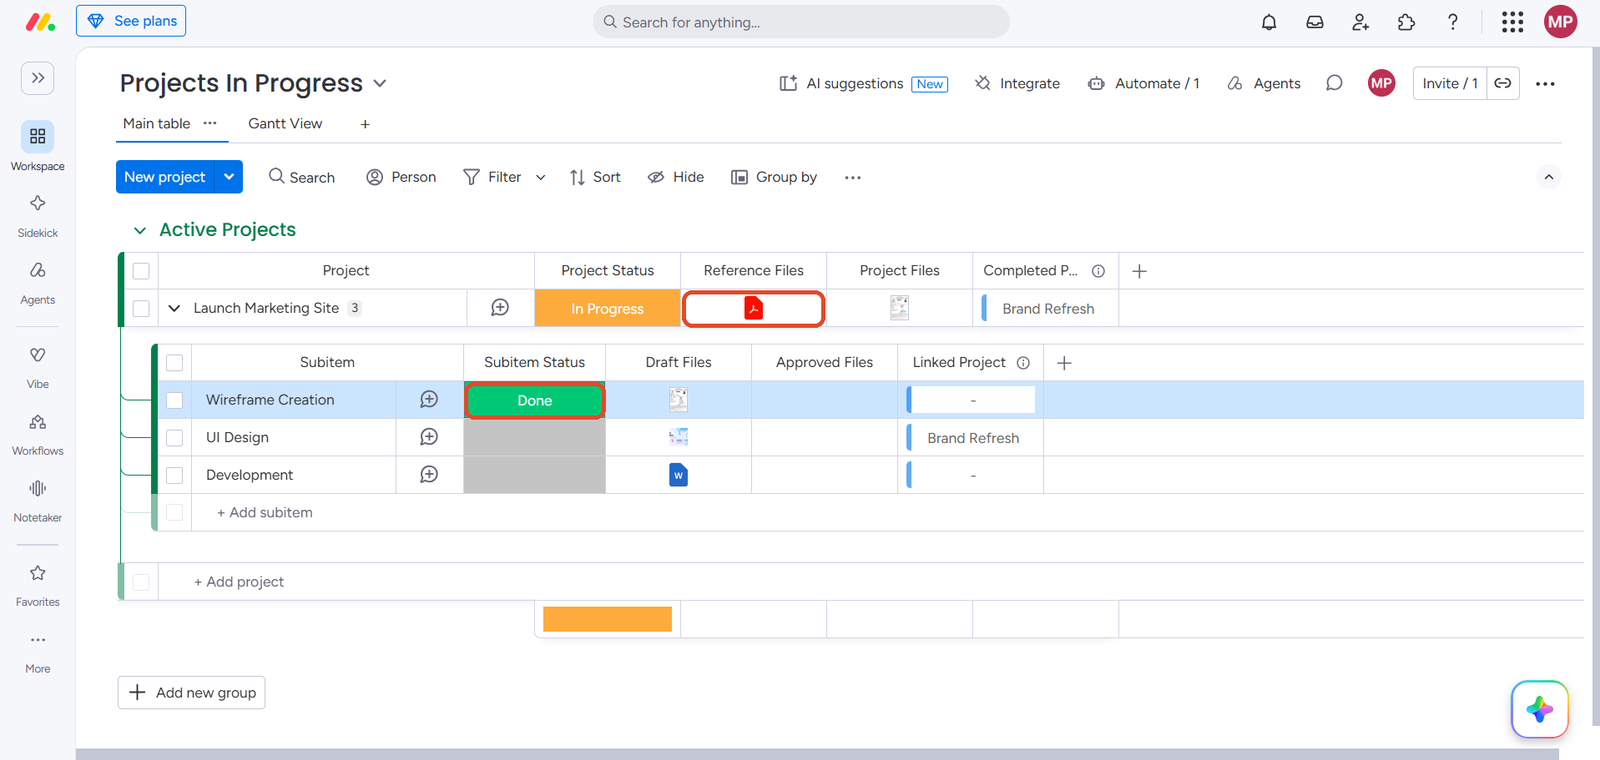
Once I changed that subitem’s Subitem Status column to Done, its file was copied into the item’s “Reference Files” column.

after the run, the file now in the item’s Reference Files

NOTE: A file that already exists in the item’s file column is not copied again.

3. Copy files from an item into its subitems

You can also copy a parent item’s files down to its subitems.

Requirements to use this recipe,

  1. A Subitem Status Column that will act as a trigger.
  2. Item File Column(files column type only) on the parent board from which the files are to be copied.
  3. Subitem File Column(files column type only) on the subitems board to which the files will be copied.
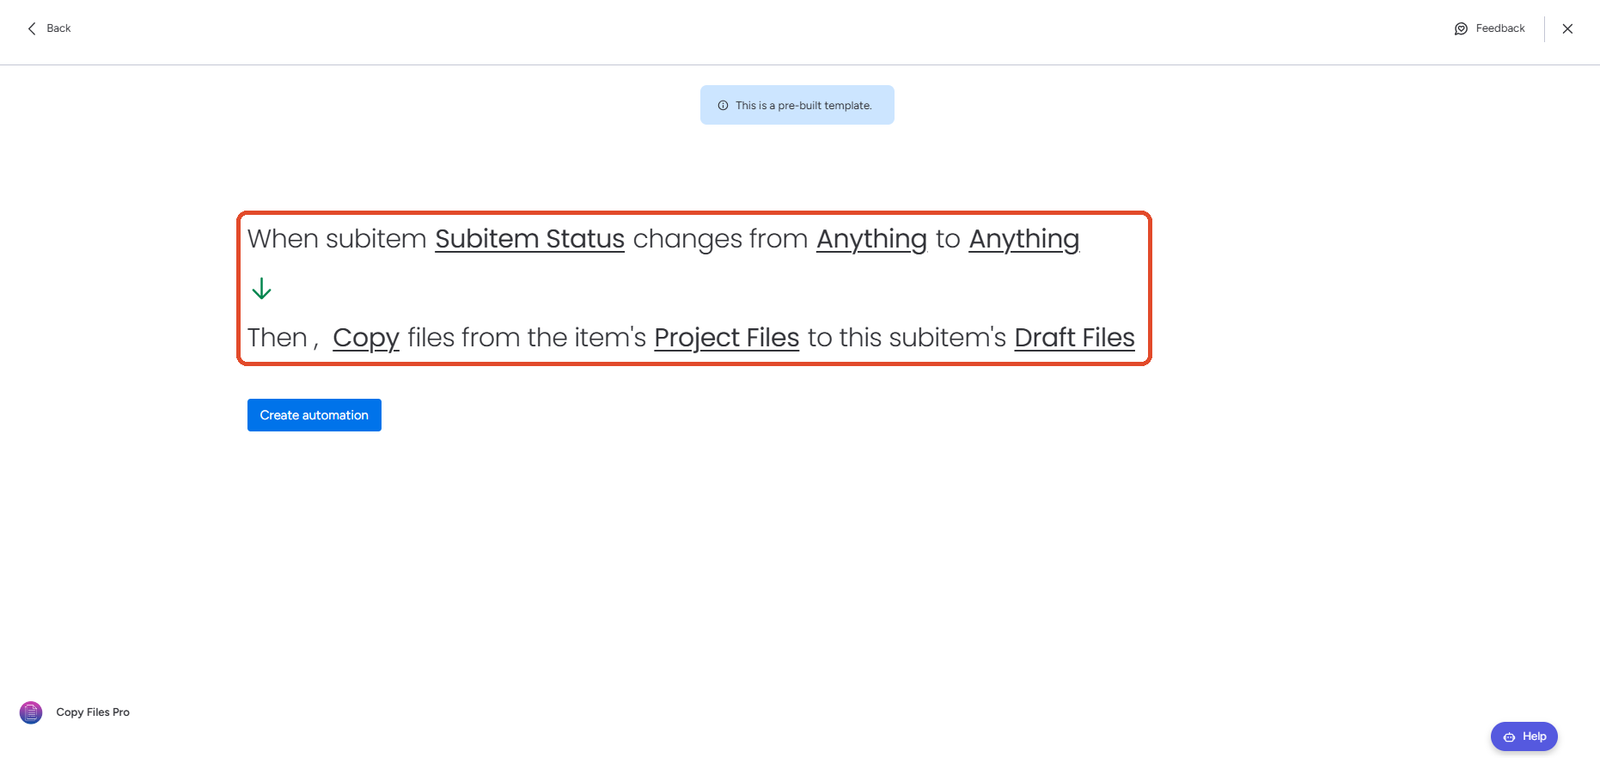
the two recipe cards in the Integrate panel the recipe sentence fully filled in

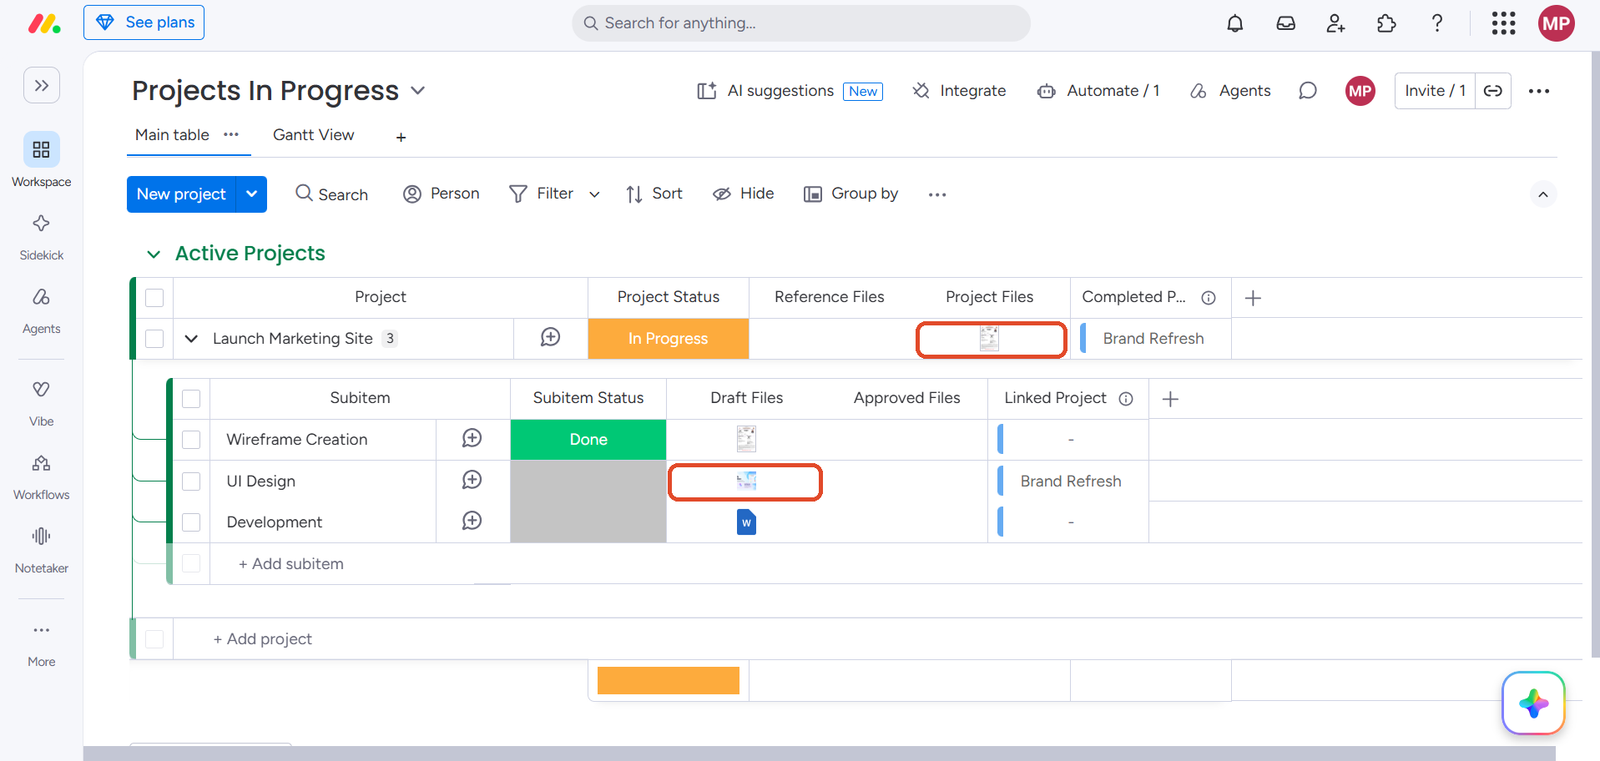
In my case, the item “Launch Marketing Site” has a file in its “Project Files” column, and the subitem “UI Design” already has a file of its own in “Draft Files”.

the item’s Project Files has a file, UI Design has one file in Draft Files

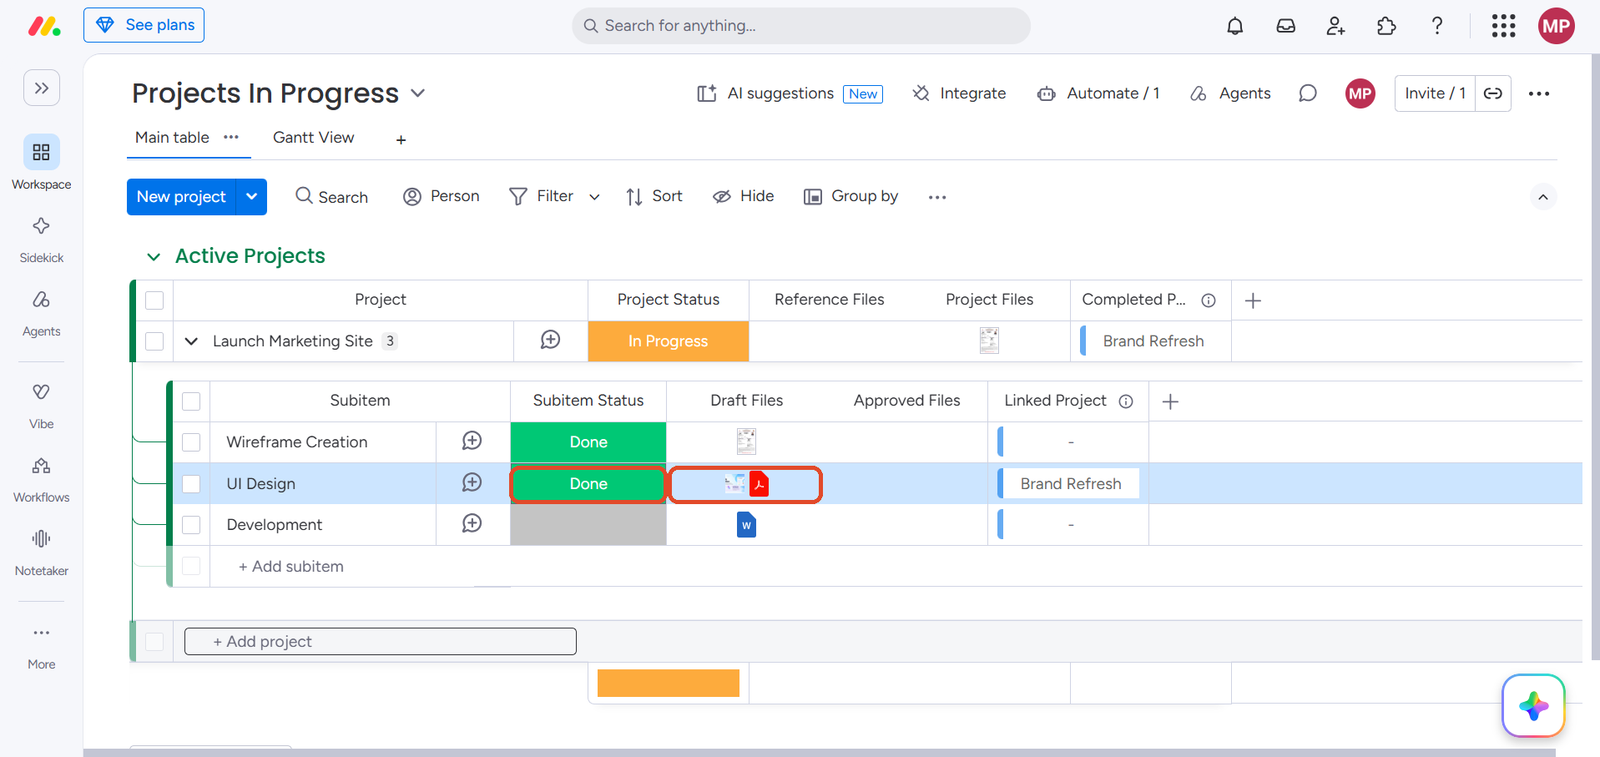
Once I changed a subitem’s Subitem Status column to Done, the item’s file was copied into that subitem’s “Draft Files” column, alongside the file that was already there.

after the run, the item’s file sitting beside the subitem’s own file in Draft Files

4. Copy files from another board into a subitem

A subitem can pull files from items on another board, in the same way an item can.

Requirements to use this recipe,

  1. A Subitem Status Column that will act as a trigger.
  2. Another Board, which acts as the source board, from which the files will be copied.
  3. Files column in the other board from which the files are to be copied.
  4. Connect Boards Column on the subitems board, connected to the same board you selected above. You can read about the connect boards column here.
  5. Destination File Column(files column type only) on the subitems board to which the files will be copied.
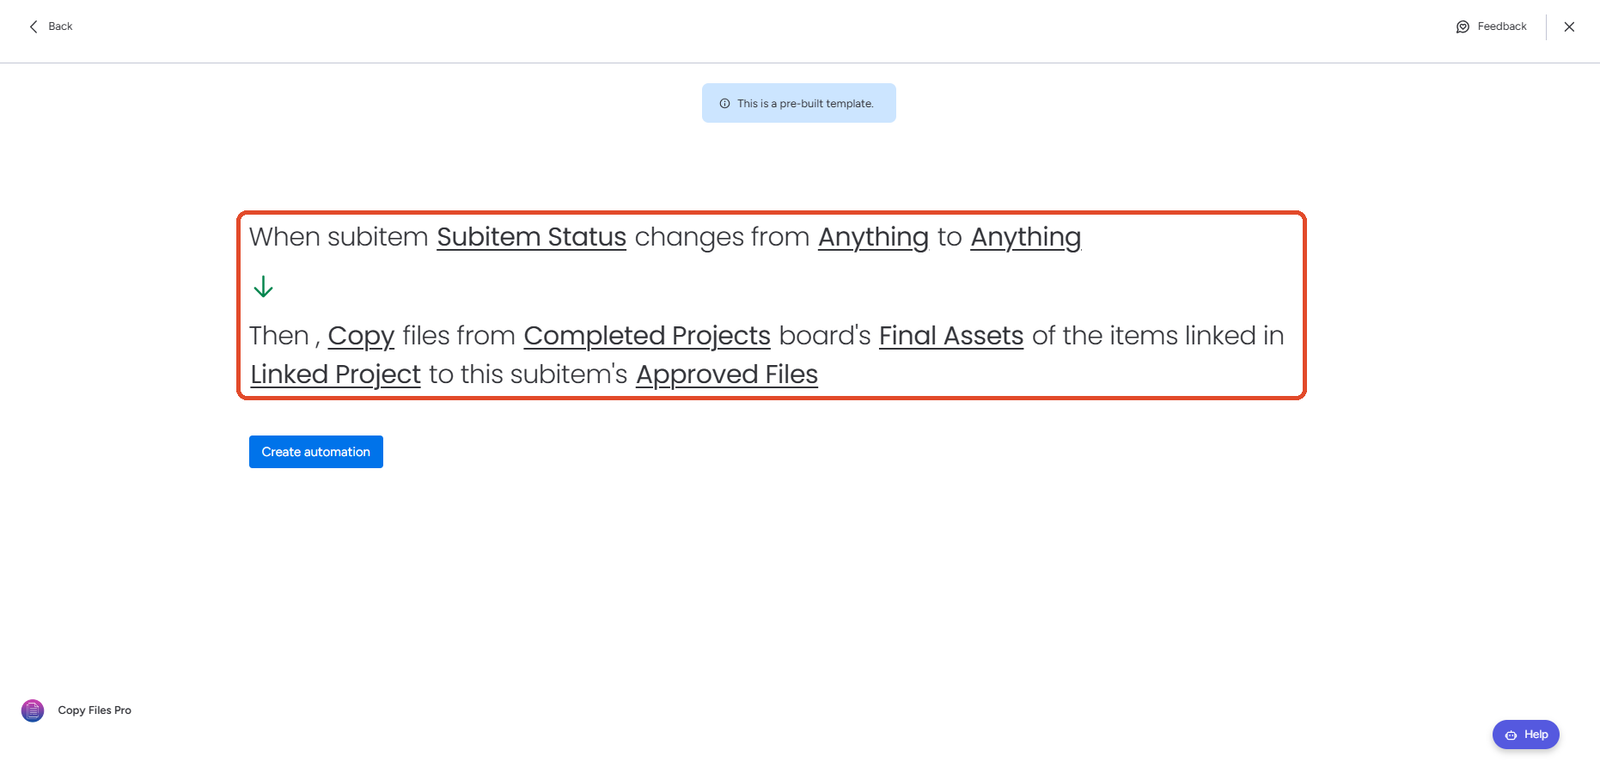
the two recipe cards in the Integrate panel the recipe sentence fully filled in

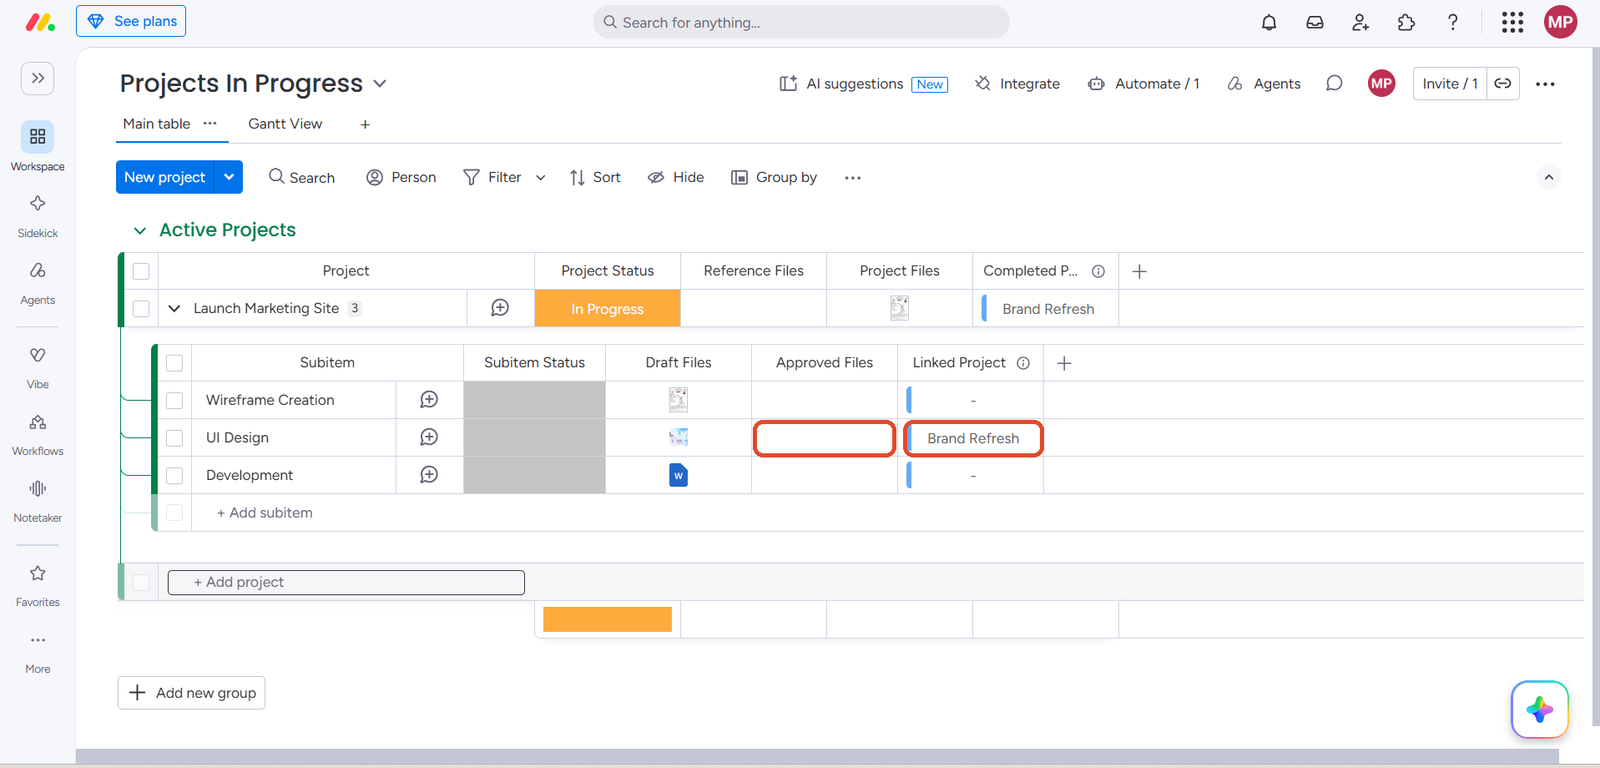
In my case, the subitem “UI Design” is connected to the “Brand Refresh” item of the other board(Completed Projects) using the subitem’s “Linked Project” connect column.

subitems expanded, UI Design’s Linked Project shows Brand Refresh, its Approved Files empty

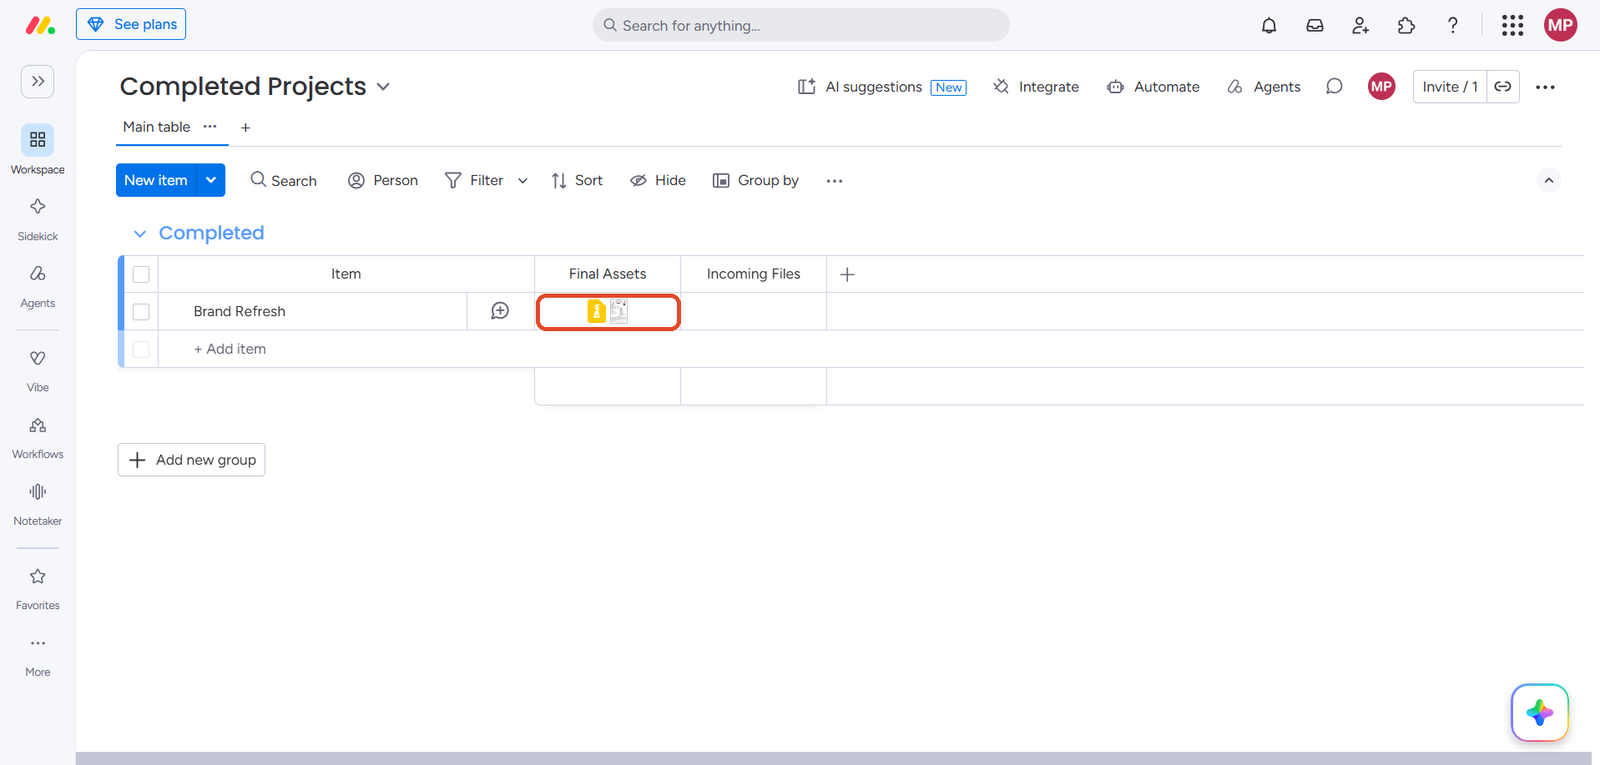
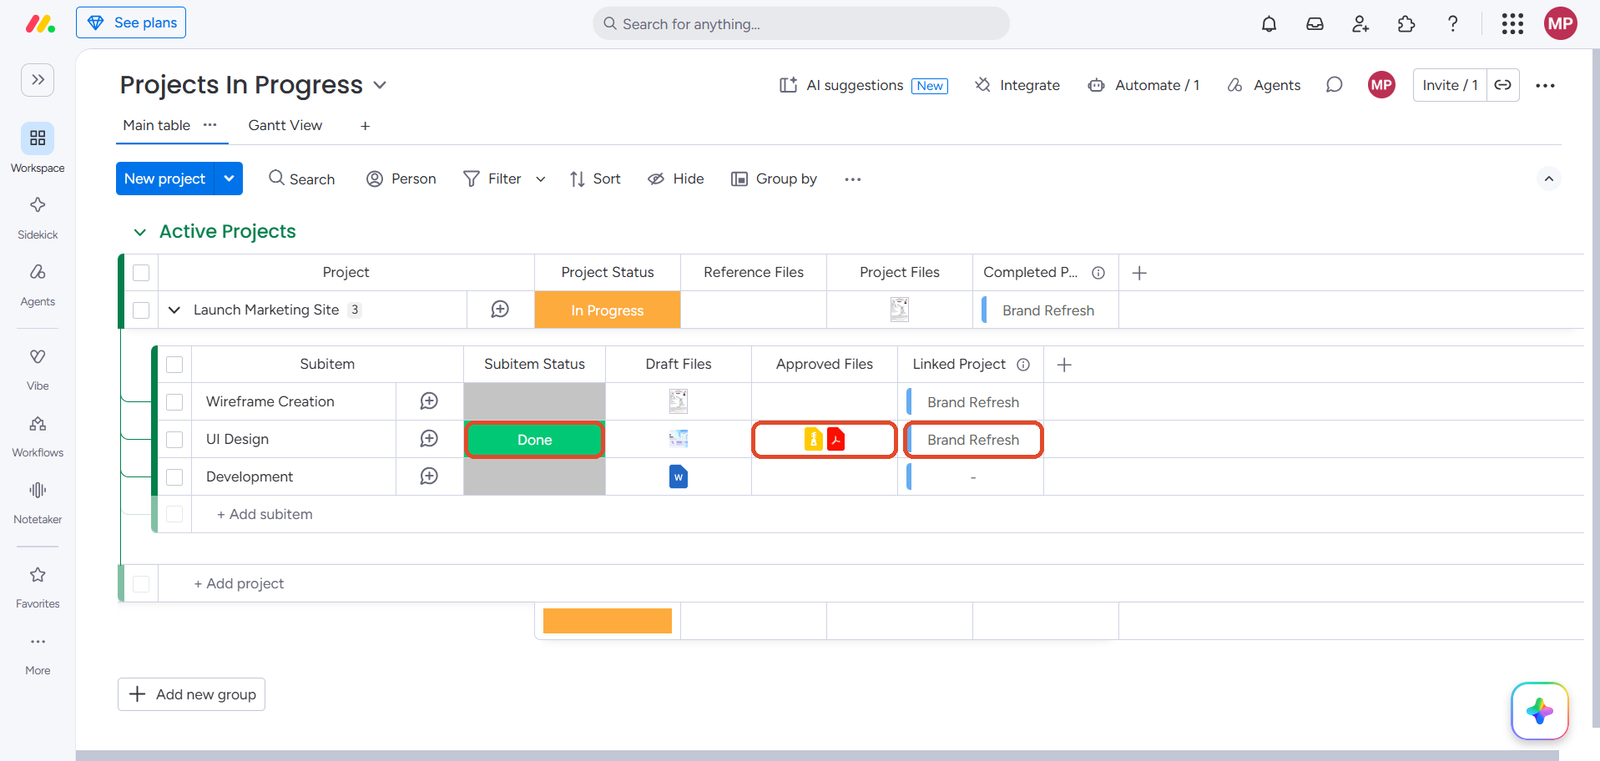
Once I changed that subitem’s Subitem Status column to Done, the files from the other board’s “Final Assets” column were copied into the subitem’s “Approved Files” column.

Completed Projects, Brand Refresh with both files in Final Assets after the run, the files now in the subitem’s Approved Files

NOTE: The Connect Boards column for this recipe must be on the subitems board, not on the parent board. A connect column that belongs to the parent item cannot be used here, because the subitem has its own connections.

5. Copy files from a subitem into another board

You can also send a subitem’s files out to the items it is connected to on another board.

Requirements to use this recipe,

  1. A Subitem Status Column that will act as a trigger.
  2. Source File Column(files column type only) on the subitems board from which the files are to be copied.
  3. Connect Boards Column on the subitems board, connected to the board you are sending the files to. You can read about the connect boards column here.
  4. Another Board, which acts as the destination board, to which the files will be copied.
  5. Files column in the other board to which the files will be copied.
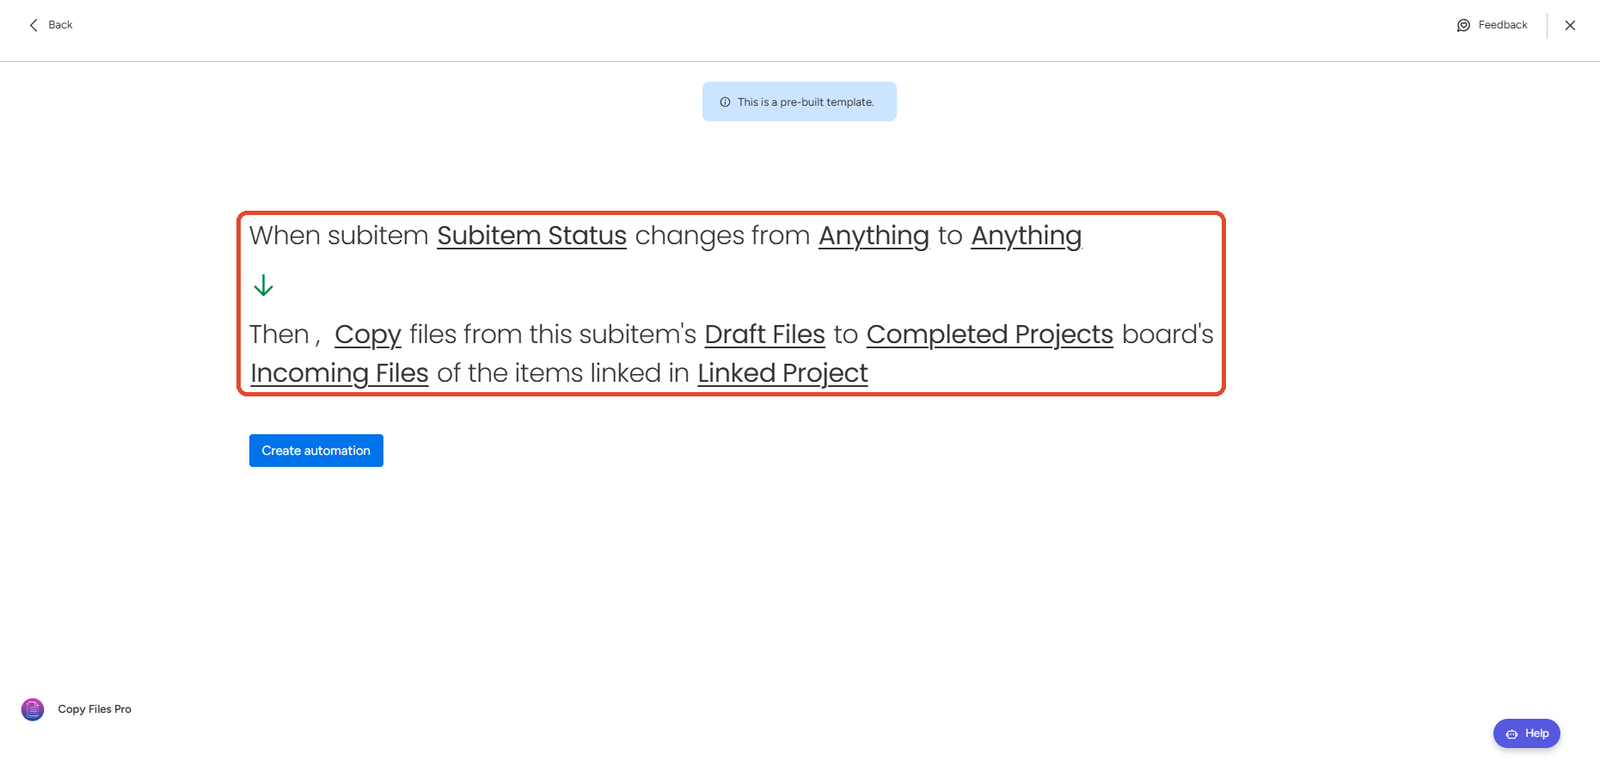
the two recipe cards in the Integrate panel the recipe sentence fully filled in

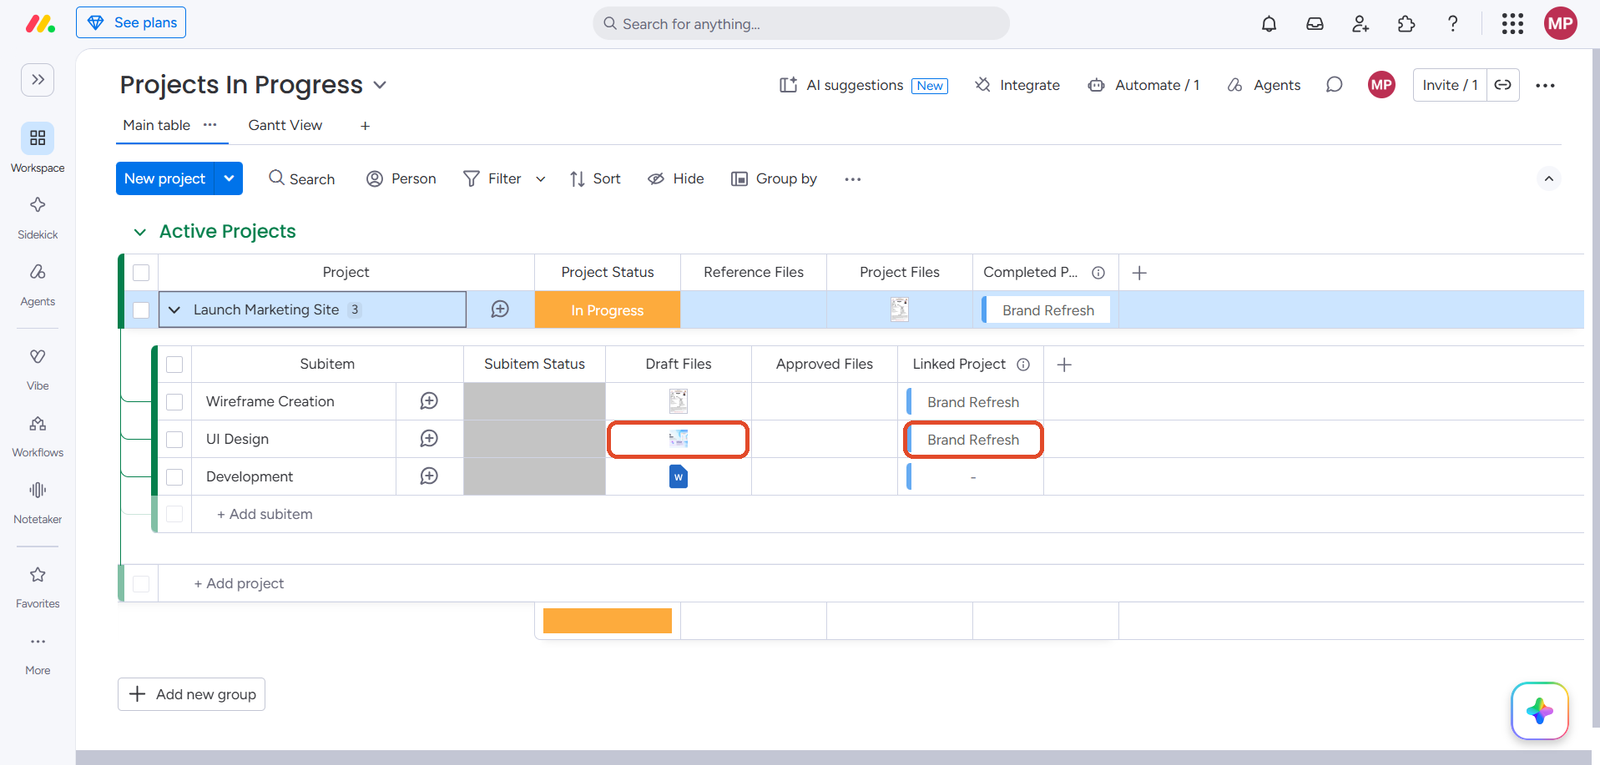
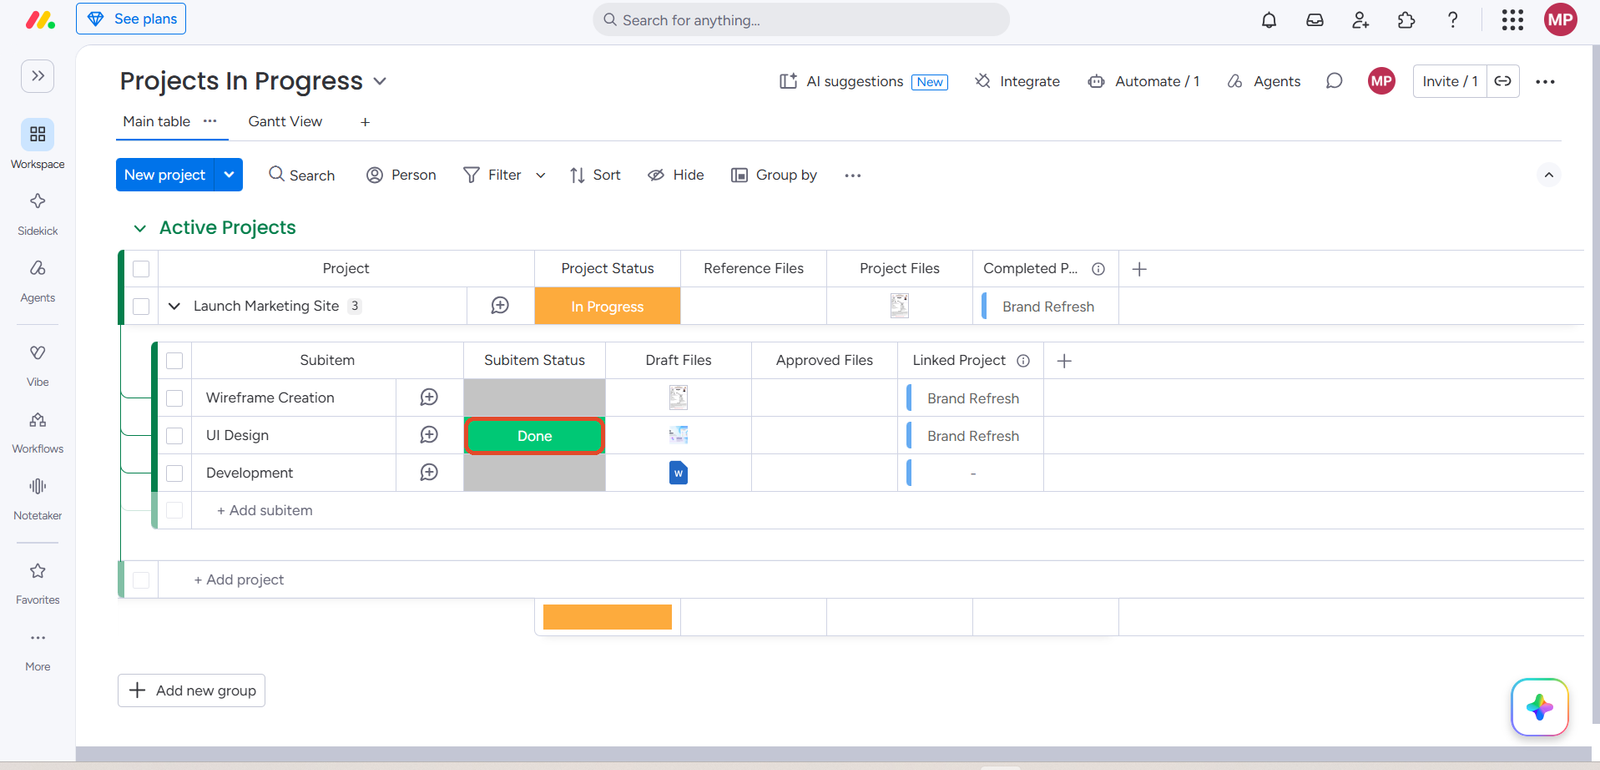
In my case, the subitem “UI Design” has a file in its “Draft Files” column and is connected to the “Brand Refresh” item of the other board(Completed Projects).

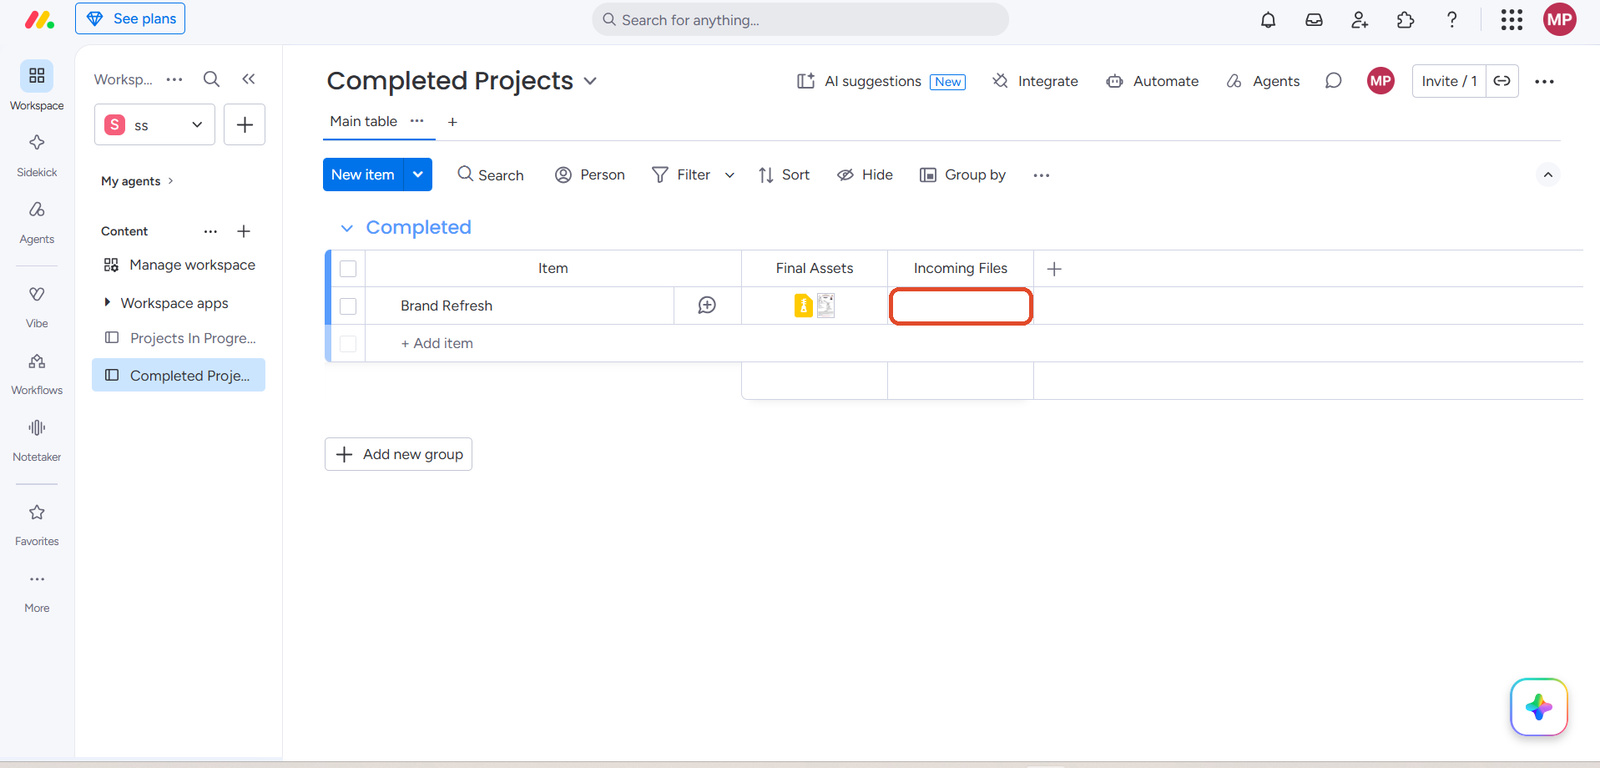
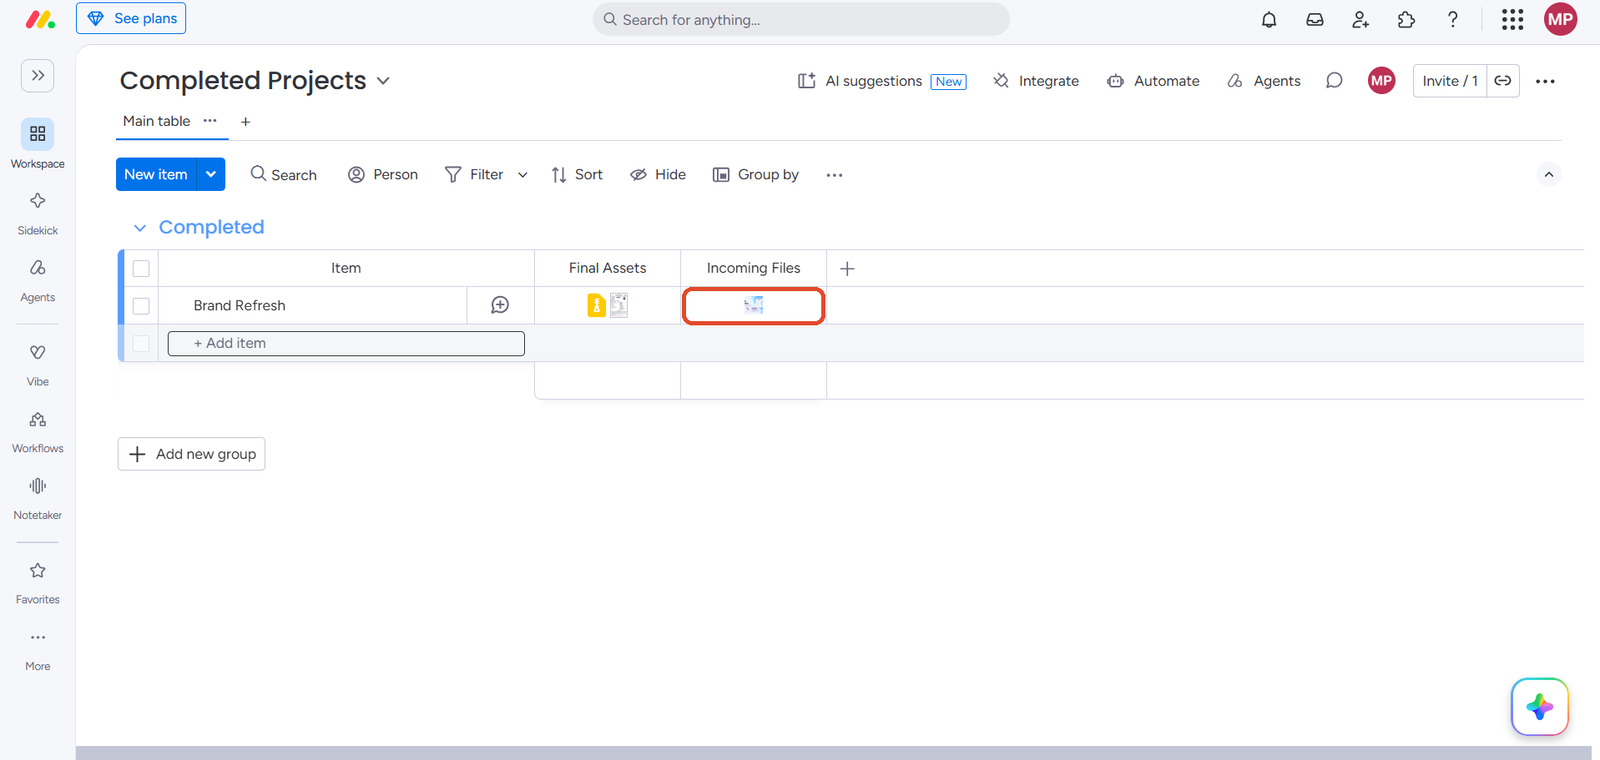
subitems expanded, UI Design has a file in Draft Files and Brand Refresh in Linked Project Completed Projects, Brand Refresh with Incoming Files empty

Once I changed that subitem’s Subitem Status column to Done, the subitem’s file was copied into the other board’s “Incoming Files” column on the connected item.

Projects In Progress, UI Design’s Subitem Status set to Done Completed Projects after the run, the file now in Incoming Files

NOTE: If the subitem is connected to several items on the other board, the files are copied to every one of them.

Copy Files Pro

Table of Contents

Meet us at Dreamforce 2026

Thanks a ton for subscribing to our newsletter!

We know your inbox is sacred, and we promise not to clutter it with fluff. No spam. No nonsense. Just genuinely helpful tips, insights, and resources to make your workflows smoother and smarter.